Quantcast
Channel: TMS Software
Viewing all 1006 articles
Browse latest View live

Cross platform messaging made easy with TMS MQTT

$
0
0

Last week we released a new product, TMS MQTT. MQTT is a standard lightweight machine 2 machine messaging protocol. This enables the instant exchange of binary or text messages between code running on various operating systems. To fully take advantage of this, we developed our TMS MQTT client to work in VCL Windows applications, FMX Windows, macOS, iOS and Android applications and also on Linux desktop or Linux variants such as Raspbian on Raspberry Pi via FPC/Lazarus.

On this 22th birthday of Delphi, I wanted to show you how our TMS MQTT component allows you to develop a messaging application in a real RAD way. I'll do this by implementing a chat application that allows you to chat between clients running on desktops or mobile devices. This effectively takes less than 40 lines of code using the TMS MQTT component of which 15 lines already go to inserting the chat text left and right in items of an FMX listbox and another +/- 10 lines detecting the origin of the chat text that is received to decide whether to show it left or right in the listbox. So, I'd say only about 15 lines of code effectively concern using the MQTT client to do the messaging.

For this demo, we use the Mosquitto MQTT test broker and connect to it with 2 lines of code:

begin
  TMSMQTTClient1.BrokerHostName := 'test.mosquitto.org';
  TMSMQTTClient1.Connect();
end;

Upon connecting, we subscribe to the topic /tms/chat/ that is the topic that will be used to exchange chat text between multiple clients. This takes 2 lines of code from the TMQTTClient.OnConnectedStatusChanged() event:
procedure TForm1.TMSMQTTClient1ConnectedStatusChanged(ASender: TObject;
  const AConnected: Boolean);
begin
  if AConnected then
    TMSMQTTClient1.Subscribe('/tms/chat/');
end;
To send a message, text entered in a memo control is published on this topic with one line of code:
  TMSMQTTClient1.Publish('/tms/chat/', TMSMQTTClient1.ClientID+'!'+ memo1.Lines.Text);
Here we add the unique ID of the app sending the chat text and the chat text itself.
Finally, incoming chat text on the subscribed topic is received via the TMQTTClient.OnPublishReceived() event. The unique client ID is retrieved to decide whether to put the chat text left or right of the message listbox and this is done via the code:
procedure TForm1.TMSMQTTClient1PublishReceived(ASender: TObject;
  APacketID: Word; ATopic: string; APayload: TArray);
var
  msg,orig: string;
  vp: integer;
  alright: boolean;
begin
  msg := TEncoding.UTF8.GetString(APayload);

  vp := pos('!', msg);

  if vp > 0 then
  begin
    orig := copy(msg,1,vp-1);
    alright := orig <> TMSMQTTClient1.ClientID;

    msg := copy(msg, vp + 1, Length(msg));
    AddMessage(msg, alright);
  end;
end;

And then comes the method to allows us to insert either left or right aligned text as items in an FMX listbox:
procedure TForm1.AddMessage(AMessage: string; AlignRight: boolean);
var
  li: Tlistboxitem;
begin
  li := Tlistboxitem.Create(self);
  li.StyledSettings := li.StyledSettings - [TStyledSetting.ssOther];
  li.Text := AMessage;
  li.Height := 22;
    li.VertTextAlign := TTextAlign.taTrailing;

  if AlignRight then
    li.TextAlign := TTextAlign.taTrailing
  else
    li.TextAlign := TTextAlign.taLeading;

  listbox1.AddObject(li);
end;

Compile and run this application on your operating system of choice. In my case, I did setup a small chat between the client compiled for Windows and the client deployed on an iPhone:

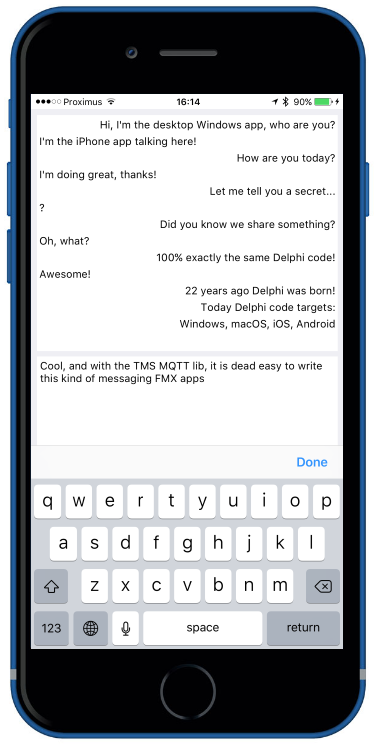
You can download the full source code of this FireMonkey application here.

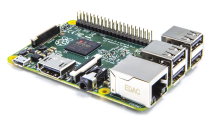
I invite you to explore the numerous exciting capabilities of machine 2 machine messaging. Note that there are JS libs that facilitate to do MQTT messaging via websockets from a webbrowser. The demo included in the TMS MQTT download is based on messaging between a desktop or mobile client app and a web page application. With the TMS MQTT client, you can also use machine 2 machine messaging from your Raspberry Pi and send this way various sensor data captured by the Raspberry Pi to desktop or mobile apps. In a follow-up blog, we'll explain and offer such sample project.

I look forward to hear about how you will use MQTT machine 2 machine messaging in your apps or IoT projects!


My Top 10 Aurelius Features - #3 Inheritance

$
0
0

How to talk about object-oriented programming and not consider inheritance? In my opinion is a basic "feature" of OOP. And how to talk about an ORM without supporting inheritance? I consider it so important that the simply fact that Aurelius supports it makes it my #3 of My Top 10 Aurelius Features.


It's really nice to be able to model classes and build a class hierarchy, reference classes in that hierarchy from other properties, have a true model that is not just a bunch of plain classes that map properties to database columns. Inheritance support allows you to really think in an OOP way when using an ORM.

TMS Aurelius supports two ways of persisting objects in a class hierarchy in the database:

Joined-tables strategy
Where data from each class is saved in a different database. This is the more normalized way.

Single-table strategy
Where data from all classes are saved in a single table. This is the simplest and often offers better performance.

Regardless of your choice, the facts is that Aurelius allows you to do so! Watch the video above to see how class inheritance works with TMS Aurelius, and if you want to get notified about upcoming videos, subscribe to our YouTube channel!

Take your chance to win a #ILoveDelphi Mug

$
0
0

With the many positive responses on our Facebook post about #ILoveDelphi and thanks to the inspiration given by Szabó about 'the cup and can', we came up with the idea to bring the love between Delphi and TMS alive in a coffee cup!

mug


Like the mug?

We're going to give away 5 coffee mugs. To make a chance on winning a mug, just add your star rating on our Facebook page together with your review! We will pick 5 winners on Thursday, March 2 and we will send a mug your way!

mug

Good luck to all the participants and thank you in advance for your review! And while you're at our Facebook page, we also like to invite you to like our Facebook company page if you're not already following our latest news via this channel.

Raspberry Pi to Delphi messaging with MQTT

$
0
0

As promised in the blog about building a chat application with MQTT, here is a follow-up article on using the TMS MQTT client, this time to setup messaging between a Raspberry Pi and a Windows PC. The TMS MQTT client fully supports Lazarus and thus also targetting Linux and its variant Raspbian, so we can use the TMS MQTT Client from Raspberry Pi. For this short demo, we setup Lazarus on Raspberry Pi and installed the TMS MQTT client component in the IDE as well as our free Raspberry Pi hardware lib.

We'll use the component TMSLCLAdaADC12b to be able to use the 12bit ADC connected via i2c to the Raspberry Pi. The goal of the setup is to read-out noise meter values via the ADC and send the measurements via messaging to the channel 'tms/raspi'. A Windows Delphi application will then listen through this same MQTT client to the messages on channel 'tms/raspi' and will display the values in our TMS Instrumentation Workshop component TvrScope. Best of all, with the help of these components, this is not much more than a 15 minute project where most of the time will be spent to properly connect the ADC breakout board via a breadboard to the Raspberry Pi i2c port.


For the code, we use the same setup in the Windows Delphi application as on the Raspberry Pi Lazarus application to connect our client to the Mosquitto test broker:

begin
  TMSMQTTClient1.BrokerHostName := 'test.mosquitto.org';
  TMSMQTTClient1.Connect;
end;

On the Raspberry Pi Lazarus app, we add a timer that will get the ADC value every 200msec and send the value as a message to 'tms/raspi'. For reason of simplicity, we'll send the value as a text message via MQTT. The code to do this is added to the timer OnTimer() event handler:

var
  i: integer;
begin
  // get value from the 4 channel ADC channel 0 to which the analog noise meter output is connected
  i := TMSLCLAdaADC12B1.ReadChannel(0);
  // send the value as text over MQTT
  TMSMQTTClient1.Publish('tms/raspi', inttostr(i)); 
end;

To get the i2c communication working on the Raspberry Pi, we open the i2c connection to the ADC in the form's OnCreate event:

procedure TForm1.FormCreate(Sender: TObject);
begin
  // make sure to start the Raspberry Pi app with sufficient permissions to be able to open access to i2c
  if not TMSLCLAdaADC12B1.Open then
  begin  
    ShowMessage('error opening i2c');
    Exit;
  end;
end;
and we close the port again from the form's OnClose event:

procedure TForm1.FormClose(Sender: TObject; var CloseAction: TCloseAction);
begin
  TMSLCLAdaADC12B1.Close;
end;

For the Delphi Windows client, here we'll add an event handler for TMSMQTTClient.OnPublishReceived() that is triggered when a message is received. From this event, we store the received value in a variable containing the last received value LastVal. Here the (positive) value of the ADC is mapped onto the 0 to 100 range:

procedure TForm1.TMSMQTTClient1PublishReceived(ASender: TObject;
  APacketID: Word; ATopic: string; APayload: TArray<System.Byte>);
var
  s:string;
begin
  s := TEncoding.UTF8.GetString(APayload);
  LastVal := Round(100 * strtoint(s) / 1024);
end;

To visualize the data, the TMS Instrumentation Workshop TVrScope component is used where we added one channel and automatic display (VrScope.Active = true). This means that at a configured frequency (VrScope.Frequency), this scope component requests the channel value and displays it in the scope. This is done via the TvrScope.OnNeedData() event that is triggered every time the scope advances and needs a new value. Here, the last received value LastVal is returned:
procedure TForm1.VrScope1NeedData(Sender: TObject; Channel: Integer;
  var Value: Integer);
begin
  Value := LastVal;
end;

As a result, here you can see some quickly captured data in our test setup:


In summary, this small demo shows how really quick & easy you can get started using m2m messaging using MQTT with the TMS MQTT Client and this on a wide range of devices, from desktop PC to mobile device, to Linux machine and to Raspberry Pi SBC. We wish you much fun with your projects and we love to hear from all the exciting stuff you create with these building blocks!

Who broke the SHA1 Algorithm?

$
0
0

SHA-1 is a hash function developed by NSA and standardized by NIST in 1994. It is implemented in many Internet protocols using cryptographic primitives, such as TLS. Last week the CWI Institute in Amsterdam and Google announced the first practical collision for SHA-1, meaning that they actually generated two files with the same cryptographic hash, something that should never happen with a hash function because collisions can be used to forge false messages in fraudulent activities.

TMS Software has been conservative with cryptographic algorithms and, while offering a wide variety of primitives in its comprehensive TMS Cryptography Pack, is committed to only supporting robust and secure algorithms. Therefore TMS Cryptography Pack never implemented deprecated algorithms such as SHA-1, MD5 or DES, but rather provides the Delphi and C++ Builder communities with the latest standards such as the AES, strong RSA, Elliptic Curve Cryptography, the SHA2 and SHA3 families and ARGON2 for key derivation and many other useful features packaged and ready to use for developers in all types of multi-platform applications.

TMS Cryptography Pack implements all these algorithms except SHA-1 and MD5

Presentation of TMS Cryptography Pack at Bordeaux and Nantes

Barnsten in organizing 2 free events in March:
Bernard Roussely from TMS Software will be presenting a client server demo showing how to generate a certificate, register to a Linux server that maintains a database of certs and then how to authenticate exchanges between clients with the server acting as a trust authority in the middle. If you are around and want to learn more about cryptography in general and TMS Cryptography Pack, register for one of these free events!

My Top 10 Aurelius Features - #2 LINQ Projections

$
0
0

LINQ Projections is the runner-up feature of My Top 10 Aurelius Features. It's a sort of "sequel" of the #5 feature LINQ Expressions and Paging, and you can see it in action in the video below.


You could consider that "LINQ Expressions" and "LINQ Projections" are just sides of the same feature. That's not incorrect indeed. But LINQ is a so nice feature of TMS Aurelius that it deserved to be split in two parts. And the reason that projections (and not expression) is ranked higher is just because it's at the core of LINQ.

The coolness of LINQ is more due projections than expressions in my opinion. An expression is actually just a comparison of two projections. It's in the projections that all complexity lies in. And it allows beautiful and complex queries like the following to be written:

Get the unit price and quantity of each order detail, multiply them, and group the sum of it by the year of Order Date.

    Manager.Find<TOrder>
      .CreateAlias('OrderDetails', 'd')
      .Select(TProjections.ProjectionList
        .Add(Linq['OrderDate'].Year.Group.As_('Group'))
        .Add((Linq['d.UnitPrice'] * Linq['d.Quantity']).Sum.As_('Value'))
      )
      .Where(Linq['OrderDate'].Year._In([1997, 1998]))
      .OrderBy('Value')
Yes, projections allow you to do grouping, counting, sum, arithmetic operations, extract information from dates like year, month, day, from strings like substring, pos, etc. A full list of available projections is in Aurelius documentation. And everything just translated correctly to the underlying SQL syntax!

Cool, isn't it? You can see queries like the ones above in action, by watching the video above. Don't forget to subscribe to our YouTube channel to get notified about upcoming videos!

One picture is worth a thousand words

One picture is worth a thousand words.


My Top 10 Aurelius Features - #1 Maturity

$
0
0

Finally, My Top 10 Aurelius Features series has come to an end. And the number 1 of the list is Maturity.


Aurelius has been first released in early 2012. Since then, in five years, it has received 33 releases! With the user feedback received during all the time, I’m confident that Aurelius feature set is pretty extensive.

For example, you can build applications for all supported Delphi platforms: Windows, Mac OS X, iOS, Android and Linux. The number of supported database systems is impressive: Oracle, MySQL, SQL Server, PostgreSQL, DB2, Firebird, SQLite, NexusDB, ElevateDB and the list goes on. The same can be said about the component libraries you can use to access the database: the list of 15 options include FireDac, dbExpress, ADO, UniDac, among others.

Maturity also means that you can trust it, because it just works. Aurelius test suite includes hundreds of unique tests, which makes up thousands of tests because we make sure that they work in all the supported platforms and servers. This means that you can be sure it will work on Windows, using dbExpress to access an Oracle database, the same way it will work on Linux, using FireDac to access a MySQL database.

In the end, why I really like this maturity feature? Because it makes my life easier and happier. Lower support because there are no known bugs that stand for too long. And happier customers because they have the features they need.

We’d love to hear your comments about it. Do you agree with this list? What would be yours? Post your opinions and comments below, visit our website, download TMS Aurelius trial and let us know what you think. Don't forget to subscribe to our YouTube channel to get notified about upcoming videos!

Introducing functional derivatives is easy

$
0
0

The unique feature of Analytics library is symbolic derivatives calculation. The library provides the simplest way to get a symbolic derivative expression for almost any complicated expression. There are predefined derivative for all standard functions: trigonometric, hyperbolic, logarithmic and exponential, inverse trigonometric and hyperbolic, and other.

Another fine thing is that any developer can easily define derivative for any other function. Let us consider how to define derivative for special Gamma function (https://en.wikipedia.org/wiki/Gamma_function#General). Its derivative is defined via another special function – Digamma (Polygamma function of order 0, https://en.wikipedia.org/wiki/Polygamma_function). Hereafter the Gamma function denoted as ‘G’ and the Digamma (and Polygamma) as ‘Y’. Then, the derivative formula is: d(G(x))/dx = G(x)*Y(x).

To introduce new functional derivative new class must be implemented. In our case, the class is inherited from ‘TSimpleFunctionalDerivative’ because the function has one argument only. Here is the code of the realized class:

TGammaDerivative = class sealed(TSimpleFunctionalDerivative)
protected
  function GetFunctionName(): string; override;
  function BaseDerivative(argument: TBaseExpression): TBaseExpression; override;
public
  class function IsRealized: boolean; override;
end;

function TGammaDerivative.GetFunctionName: string;
begin
  result:= 'G';
end;

class function TGammaDerivative.IsRealized: boolean;
begin
  result:= true;
end;

function TGammaDerivative.BaseDerivative(argument: TBaseExpression): TBaseExpression;
var
  ge: TBaseExpression;
  dge: TBaseExpression;
begin
  ge:= TFunctionExpression.CreateSimple('G', argument);
  dge:= TFunctionExpression.CreateSimple('Y', argument);

  result:= TProductExpression.MakeProduct(ge, dge);
end;
As can be seen from the code, there are only three methods to override. The GetFunctionName method defines that the derivative is for function with name ‘G’. The IsRealized functions returns ‘true’, that means the class is totally realized and can be used by the Analytics system. And the last method defines the derivation algorithm itself. Namely, it creates the Gamma and Digamma functions with the same argument and, according to the derivative formula above, their product.

Now we can calculate derivatives for expressions with the Gamma function. For the simplest case with input string ‘G(x)’ we get the expected output string ‘G(x)*Y(x)’. No surprise here, because we just wrote the code, which produces the output.

But the amazing thing is when we trying to calculate the derivative expression for the Gamma function with a composite argument. As example, for the input string ‘G(x^2+1)’ it produces the output string ‘(G(x^2+1)*Y(x^2+1))*(2*x)’ which is totally correct for this case. And the output is correct for all the expressions with the Gamma function. It is because the Analytics library cares about other things, like implementing the ‘chain rule’ for derivation process.

The source code of the example project is available here.

Boost your productivity with TMS components & RAD Studio 10.2 Tokyo

$
0
0

Yesterday Embarcadero released Delphi, C++Builder and RAD Studio 10.2 Tokyo:
https://www.embarcadero.com/products/rad-studio/whats-new-in-10-2-tokyo

For our registered users, already several products are ready for this new RAD Studio version! So get started today with your Windows or cross-platform development in 10.2 Tokyo with TMS VCL, FMX and FNC components.

TMS rollout of components with RAD Studio 10.2 Tokyo support:

  VCL Windows application development
  FMX cross-platform application development
  FNC cross-platform & cross-framework application development
  Developer tools for Delphi developers
Our team is working hard to continue to add RAD Studio 10.2 Tokyo support to our other wide range of component products. You can track here the progress of our work to cover other products. For trial users, RAD Studio 10.2 Tokyo support will follow soon.

Upcoming event: TMS Day in Fredericia, Denmark on May 18th

$
0
0

We are excited to announce that Jens Fudge, Embarcadero MVP for Denmark, and TMS software are planning a TMS day in Denmark on May 18th.

All day, sessions will be spent on TMS VCL components, TMS FNC components and TMS Cloud components and with also sufficient session time allocated to handle your specific questions on TMS components. The sessions will be given by Bruno Fierens, Embarcadero MVP in Belgium and CTO from tmssoftware.com.

All sessions will be in English.

In tentative program

9h00
TMS FNC Controls architecture
Insight in the architecture of the TMS FNC controls and a brief introduction to using the TMS FNC library to write custom controls for VCL, FMX, LCL.

10h00
TMS FNC Controls overview
Overview of TMS FNC UI Controls in the TMS FNC UI Pack, TMS FNC Chart, TMS FNC Blox

11h00
TMS MQTT
Use the TMS messaging component for machine 2 machine messaging from Windows, iOS, Android, Android, Linux.

12h00
Lunch

13h00
TMS VCL Components tips & tricks
An overview of less known features in TMS VCL components

14h00
TMS Google Mapping components
Overview of features and advanced capabilities in the TMS Google Mapping components for VCL & FMX.

15h00
TMS Cloud Components & myCloudData
Access popular cloud services from VCL and FMX applications. Use service agnostic cloud file storage access. Use cloud data storage with the myCloudData service.

16h00
TMS PDF Library
Use the cross-platform PDF generation engine and applying the PDF lib for automatic PDF generation from several TMS components.

Location

Archersoft ApS
Vesterballevej 5
7000 Fredericia
Denmark


Register now!

Sign-up now for the TMS Day in Denmark in Fredericia, Denmark on May 18th, 2017. The cost of the TMS Day is only a small fee of 35 EUR (VAT exclusive) for the food and drinks during this day.

Don't delay your registration as the number of seats is limited.

TMS Aurelius, the ORM for Delphi: For Linux. For Free.

$
0
0

Embarcadero has just released RAD Studio 10.2 Tokyo, the latest version of the great Delphi/C++Builder development tools. And the greatest feature of this release is the ability to compile for Linux!


After a few days following Tokyo release, we were glad to release a new version (3.7) of TMS Aurelius, our ORM framework, with Linux support. Yes, you can now build applications for Linux, using TMS Aurelius, with all the stability and robustness you are used to.

To celebrate this milestone in Delphi development, we are also announcing now that TMS Aurelius Free Edition is back. TMS Aurelius Free Edition has no license restrictions, you can build commercial applications with it, and it has all features of registered license, including Linux support. The promotion will run until April 30th, just visit the TMS Aurelius Free Edition page to register for it and receive a download link.

Finally, in case you have not seen it, the "My Top 10 Aurelius Features" series has finished. It's a great video-series for starters wanting to know more about TMS Aurelius and its capabilities.

"My Top 10 Aurelius Features" blog post
"My Top 10 Aurelius Features" playlist


TMS hands-on training day in Kortrijk, Belgium on June 8th

$
0
0

TMS software organizes a new training day on Thursday June 8th in Kortrijk - Belgium.

All day, sessions will be spent on TMS VCL components, TMS FNC components and TMS Cloud components with also sufficient session time allocated to handle your specific questions on TMS components. The sessions will be given by Bruno Fierens, Embarcadero MVP in Belgium and CTO from tmssoftware.com and Bernard Roussely, product manager of TMS Cryptography Pack. All sessions will be in English.


In tentative program

9h00 - TMS FNC Controls architecture
Insight in the architecture of the TMS FNC controls and a brief introduction to using the TMS FNC library to write custom controls for VCL, FMX, LCL.

10h00 - TMS FNC Controls overview
Overview of TMS FNC UI Controls in the TMS FNC UI Pack, TMS FNC Chart, TMS FNC Blox

11h00 - TMS MQTT
Use the TMS messaging component for machine 2 machine messaging from Windows, iOS, Android, Android, Linux.

12h00 - Lunch

13h00 - TMS Google Mapping components
Overview of features and advanced capabilities in the TMS Google Mapping components for VCL & FMX.

14h00 - TMS Cryptography components
Using the TMS Cryptography components in a client-server scenario with certificate generation

15h00 - TMS Cloud Components & myCloudData
Access popular cloud services from VCL and FMX applications. Use service agnostic cloud file storage access. Use cloud data storage with the myCloudData service.

16h00 - TMS PDF Library
Use the cross-platform PDF generation engine and applying the PDF lib for automatic PDF generation from several TMS components.

17h00 - Closing Q&A

Location

  • Hotel Ibis Styles Kortrijk Expo, Pres. Kennedypark 1, B-8500 Kortrijk
  • Free parking
  • Nearby highway (E17) exit
  • Facilities for hotel rooms at the event are available for international attendees


Registrations until May 31st

The cost of the TMS training day is 95 € exclusive VAT. This includes a full day access to the sessions and coffee/drinks during this day. A hot meal is served for lunch. Register now!

TMS FixInsight and the inline directive

$
0
0

The Delphi compiler allows functions and procedures to be tagged with the inline directive to improve performance. If the function or procedure meets certain criteria, the compiler will insert code directly, rather than generating a call. Embarcadero docwiki gives a list of conditions under which inlining does or does not occur.

One of basic conditions says: within a unit, the body for an inline function should be defined before calls to the function are made.

TMS FixInsight 2017.04 introduces rule O805 “Inline marked routine comes after its call in the same unit”. Let’s check FMX and VCL code to see if Embarcadero follows their own rules. Short answer: it doesn’t.

I will give a couple of examples from Delphi 10.1 Berlin (version 24.0.22858.6822).

Vcl.Controls.pas

//at line 8529 
procedure TWinControl.ReadState(Reader: TReader);
begin
  DisableAlign;
  try
    inherited ReadState(Reader);
  finally
    EnableAlign;
  end;
  FixupTabList;
  if FParent <> nil then Perform(CM_PARENTCTL3DCHANGED, 0, 0);
  UpdateControlState;
end;

Vcl.Controls.pas
//at line 9010
procedure TWinControl.AlignControl(AControl: TControl);
var
  Rect: TRect;
begin
  if not HandleAllocated or (csDestroying in ComponentState) then Exit;
  if FAlignLevel <> 0 then
    Include(FControlState, csAlignmentNeeded)
  else
  begin
    DisableAlign;
    try
      Rect := GetClientRect;
      AlignControls(AControl, Rect);
    finally
      Exclude(FControlState, csAlignmentNeeded);
      EnableAlign;
    end;
  end;
end;

Vcl.Controls.pas
//at line 9030 
procedure TWinControl.DisableAlign;
begin
  Inc(FAlignLevel);
end;
TWinControl.DisableAlign is an inline marked procedure. It is called at line 8531 and line 9019, but its body is defined after the calls – at line 9030. Obviously, this function will not be inlined.

One more example from another unit:

Fmx.ListView.pas
//at line 2430 
procedure TListViewBase.UpdateDeleteButtonLayout;
var
  RelRect: TRectF;
begin
  if (Adapter.Count < 1) or (FDeleteLayout = nil) or ((FDeleteButtonIndex = -1) and
    (FPrevDeleteButtonIndex = -1)) then
    Exit;
 
  if (FListingService <> nil) and (TListingTransitionFeature.DeleteButtonSlide in FListingService.GetTransitionFeatures) then
  begin
    FDeleteLayout.Width := DefaultDeleteButtonWidth * FDeleteModeTransitionAlpha;
    FDeleteButton.Opacity := 1;
  end
  else
  begin
    if FDeleteModeTransitionAlpha > 0 then
      FDeleteLayout.Width := DefaultDeleteButtonWidth
    else
      FDeleteLayout.Width := 0;
 
    FDeleteButton.Opacity := 0.5 + (FDeleteModeTransitionAlpha / 2);
  end;
 
  FDeleteLayout.Height := GetItemHeight(FDeleteButtonIndex);
  FDeleteLayout.Position.X := Width - FDeleteLayout.Width;
 
  if FDeleteButtonIndex = -1 then
    RelRect := GetItemRelRect(FPrevDeleteButtonIndex, LocalRect)
  else
    RelRect := GetItemRelRect(FDeleteButtonIndex, LocalRect);
 
  FDeleteLayout.Position.Y := (RelRect.Top + RelRect.Bottom - FDeleteLayout.Height) / 2;
end;
The method above contains two GetItemRelRect calls (lines 2457 and 2459), but both are before the actual GetItemRelRect body position in that unit (line 2868):

Fmx.ListView.pas
//at line 2868
function TListViewBase.GetItemRelRect(const Index: Integer; const LocRect: TRectF;
  const SideSpace: Integer = 0): TRectF;
begin
  Result := RectF(LocRect.Left + FSideSpace + SideSpace, LocRect.Top + FSideSpace + FHeightSums[Index] - FScrollViewPos,
    LocRect.Width - ((SideSpace + FSideSpace) * 2), GetItemHeight(Index));
 
  if (FScrollBar <> nil) and (not HasTouchTracking) and FScrollBar.Visible then
    Result.Right := Result.Right - FScrollBar.Width;
end;
Despite being declared as inline, this method will not be inlined.

It is not a critical issue, but this makes inline directive useless. There are more occurrences of this issue in Vcl.ExtActns.pas, FMX.ASE.Lexer.pas, FMX.Graphics.pas, FMX.Types.pas, FMX.Utils.pas and FMX.ZOrder.Win.pas.

This means that inlining conditions are not easy to follow, even though at first glance inline directive seems to be an easy way to slightly optimize your code. TMS FixInsight may help to make inlining more useful by avoiding such mistakes.

You can download TMS FixInsight trial and check your own code.


TMS XData REST Server on Linux - Step by Step - Part 1

$
0
0

Latest versions of TMS XData and TMS Sparkle have been just released with a major feature: Linux support. You can now deploy your XData/Sparkle server to Linux using Delphi 10.2 Tokyo, and in this video/blog post series, I will show you how to create and deploy such a server step-by-step. Since some Delphi users are mostly Windows users, I believe some of them are not very familiar with Linux and/or Apache, and because of that this tutorial is very basic and very detailed, covering it from the very beginning.

Here is the video with the first part: installing Linux on VirtualBox and connecting to it from Windows computer.


We will use Virtual Box to create our virtual machine, but you can choose any tool you want, if you are used to: VMWare, Parallels, Hyper-V, etc.

1. Download VirtualBox from https://www.virtualbox.org/wiki/Downloads and install it.

Just follow installer using default settings.

2. Download Ubuntu Linux Server from https://www.ubuntu.com/download/server

We will use the Server edition here (no GUI available by default). Save the ISO file in some folder, we will use it in step 3 below.

3. Create and configure VM

a) Create a new VM, name it, choose Linux as the guest OS
b) Just use default settings in the VM wizard, you can increase RAM or disk size if you want to
c) Once VM is created, change Network Adapter to Bridge (optional, I personally find it easier as it appears as another computer in the network)
b) Add the Ubuntu ISO file as a virtual disk in the VM storage

4. Launch VM and install Ubuntu

Launch VM and the Ubuntu installer will start from the ISO. Just use default settings for most of the install. You can follow the video for more details, but the installer will just ask for user name and password to be created, and several basic settings that you can just confirm what is presented.

5. Login and update OS

After install is complete, login and upgrade the system with the following commands on Linux terminal:

sudo apt-get update
sudo apt-get dist-upgrade

6. Preparing Linux for remote connection

We shouldn't have to switch to Linux VM all the time we want to operate on it. We can just connect to it from Windows. For that, we would need to install openssh-server package, and it will help if we install Samba so we can find our Linux computer by host name:

sudo apt-get install openssh-server samba
You can check the IP address of your Linux computer:

hostname -I
or just check the host name using hostname command:

hostname
7. Connect from Windows

We don't have to switch to Linux VM all the time we want to operate on it. We can just connect to it from Windows. For that, download Putty from http://www.putty.org and install it.

It will ask for the IP or host name for the connection, type the one you found in step 6 above, login using your credentials, and you're done.

In the next part we will create our first "Hello, World" application on Linux using Delphi.

TMS XData REST Server on Linux - Step by Step - Part 2

$
0
0

This is part 2 of the tutorial on how to create TMS XData and TMS Sparkle servers on Linux. On Part 1, we have installed Ubuntu and connected to it from Linux.

Here is video for second part: Installing PAServer on Linux and running our first "Hello, World" application on it.


To install PAServer, we need to send the tar.gz file containing PAServer files to Linux.

1. Download WinSCP from https://winscp.net/eng/download.php and install it.

To transfer files between Windows and Linux, we will use WinSCP tool. It's very convenient, just install it, and connect to Linux using same configuration/credentials we used when connecting with Putty (actually it even detects Putty is installed and asks if you want to import connection settings).

2. Transfer file LinuxPAServer19.0.tar.gz file to Linux

That file is located in the PAServer folder of your Delphi installation directory. If you used default settings, this should be in "C:Program Files (x86)\EmbarcaderoStudio\9.0\PAServer" folder.

To transfer, just drag that file and drop it in WinSCP in the Linux folder you want. I recommend transferring it to your Linux home folder (/home/yourusername) which should be the default folder displayed when WinSCP is open.

3. Decompress PAServer

On Linux terminal, type the following command to decompress PAServer:

tar -xvf LinuxPAServer19.0.tar.gz


4. Launch PAServer

The files should be decompressed in a newly created folder named "PAServer-19.0". If you are still in the same directory, you can launch paserver with the following commands:

cd PAServer-19.0
./paserver


5. Create a new console application in Delphi with Linux64 support

Go back to Delphi and create a simple console application. Add Linux64 platform to it using the project manager. You can add a line to output a "Hello, Linux!" message:

WriteLn('Hello, Linux');


6. Build application to download SDK

Use menu "Project | Build" to build the console application. Delphi should warn you that you need Linux SDK, and would ask you for settings to connect to a Linux computer to download the SDK.

Type a name for the connection, enter the IP (or hostname) of the Ubuntu Linux computer we're running the PAServer, and you can proceed. Delphi should connect to the PAServer on Linux and download all files needed to build Linux applications. The download should take a while.

7. Run the application

Run the application (without debugging). Delphi should connect to the PAServer, send the application to Linux and launch it from there. If you go to Linux terminal, you should see the "Hello, Linux" message on it.

In the next part we will create and deploy our first Apache module on Linux.

TMS XData REST Server on Linux - Step by Step - Part 3

$
0
0

This is part 3 of the tutorial on how to create TMS XData and TMS Sparkle servers on Linux. On Part 2, we have installed PAServer and launched our first "Hello, World" console application on Linux.

Here is video for part 3: Create and deploy an Apache module to Linux.


We will use WebBroker to create an empty Apache module. But first we need to install Apache on Linux.

1. Install Apache on Linux

On Linux terminal, use the following command to install Apache:

sudo apt-get install apache2

This should be enough to get Apache up and running. You can open your browser on Windows and just try to open the root page (let's consider our host name is "ubuntu" from now on):

http://ubuntu/

And you should get a page from server telling you that Apache is running.

2. Create WebBroker Apache module in Delphi

Going back to Delphi, use menu option "File, New, Open...", then choose "Delphi Projects, WebBroker, Web Server Application".

Check "Linux" option, Next, and then select "Apache dynamic link module". When choosing the module name, type "xdata_module". Of course you can use any name you want, but we will use this name for further configuration in this tutorial. Finish the wizard and you will have the module created.

3. Build and deploy Apache module to Linux

Now build your Apache module (make sure to first select Linux64 platform in Project Manager, otherwise you would be building the module for Win32), and then click "Project, Deploy" menu option to deploy it to Linux. If you still have your PAServer running on Linux, it should send the module file to Linux.

The deployed file location should be something like this:

/home/user/PAServer/scratch-dir/User-Ubuntu/mod_xdata/libmod_xdata.so

I might be slightly different in your Linux computer, because you might have used a different user name for Linux user, and a different user name/profile in your Windows machine (the "User-Ubuntu" part). You can simply use WinSCP from Windows to browse your Linux files and discover where is the .so file deployed by PAServer. You should find it by navigating from the PAServer folder created in your home directory.

4. Create Apache configuration files

We must now configure Apache to use our new module. On Linux terminal, go to Apache module configuration folder:

cd /etc/apache2/mods-available

Create two new configuration files:

sudo touch xdata.conf
sudo touch xdata.load

Edit the first file to load module (we will use Nano editor here, if you don't have it installed in your Linux, you can use command "sudo apt-get install nano"):

sudo nano xdata.load

Use the following content for xdata.load file. Here we must use the location where our .so module file was deployed, as we saw in step 3.

LoadModule xdata_module /home/user/PAServer/scratch-dir/User-Ubuntu/mod_xdata/libmod_xdata.so

Press Ctrl+X to save and exit from nano editor, and then let's edit xdata.conf file:

sudo nano xdata.conf

This should be the content of this file:

<Location /tms>
    SetHandler libmod_xdata-handler
</Location>

Save that file as well, and Apache configuration is finished.

5. Enable Apache module

The configuration files we created are just a module that is "available". We should now enable the module using the following command:

sudo a2enmod xdata


6. Restart Apache

Now we should stop and restart Apache service. Use the following commands for that (we will use such commands very often further in next parts of this tutorial):

sudo apache2ctl stop
sudo apache2ctl start


7. Test Apache module

Now we can go back to Windows, use our browser and go to the following url (remember to change "ubuntu" to the hostname or IP address of your Linux machine, if it's different):

http://ubuntu/tms

And the browser should display "Web Server Application" as result.

In the next part we will learn how to add TMS Sparkle to the Apache module.

TMS XData REST Server on Linux - Step by Step - Part 4

$
0
0

This is part 4 of the tutorial on how to create TMS XData and TMS Sparkle servers on Linux. On Part 3, we have created and deployed our first Apache Module using WebBroker. Now we're going to add TMS Sparkle to it.

Here is video for part 4: Adding TMS Sparkle and using Sparkle modules in the Apache module.


Basically, what we need to do is "wrap" the WebBroker request/response objects into a Sparkle request/response objects. So any Sparkle module can process the requests and provide responses. This part is also described in the documentation, in this page: http://www.tmssoftware.biz/business/sparkle/doc/web/apache-based-server.html

1. In WebModuleUnit1 unit, add the units Sparkle.WebBroker.Server and Sparkle.WebBroker.Adapter to the uses clause:

uses {...},
  Sparkle.WebBroker.Server,
  Sparkle.WebBroker.Adapter,
   // just for the anonymous module example
  Sparkle.HttpServer.Module, Sparkle.HttpServer.Context;


2. Declare and create a global TWebBrokerServer instance:

Add a global variable declaration in the unit:

var
  Server: TWebBrokerServer;

And then create it in initialization:

initialization
  Server := TWebBrokerServer.Create;
finalization
  Server.Free;
end.


3. Replace the WebModule1DefaultHandlerAction event handler with the code below to dispatch the requests:

procedure TWebModule1.WebModule1DefaultHandlerAction(Sender: TObject;
  Request: TWebRequest; Response: TWebResponse; var Handled: Boolean);
var
  Adapter: IWebBrokerAdapter;
begin
  Adapter := TWebBrokerAdapter.Create(Request, Response);
  Server.DispatchRequest(Adapter);
end;

And this should be enough to have TMS Sparkle "plugged" into the Apache module. From now on, you can code just like you do on Windows: create Sparkle modules (like XData), and add them to the server Dispatcher. As a quick example, you could add the following anonymous module to test:
initialization
  Server := TWebBrokerServer.Create;
  // add modules you want to use. This example assumes a simple Sparkle module,
  // but you can add your XData, RemoteDB or any other Sparkle module
  Server.Dispatcher.AddModule(TAnonymousServerModule.Create(
    'http://localhost/tms/hello',
    procedure(const C: THttpServerContext)
    begin
      C.Response.StatusCode := 200;
      C.Response.ContentType := 'text/plain'';
      C.Response.Close(TEncoding.UTF8.GetBytes('Hello from Sparkle!'));
    end
  ));
finalization
  Server.Free;
end.

Now you can rebuild the module and deploy to Linux. If you now go to Linux and restart Apache:

sudo apache2ctl stop
sudo apache2ctl start

And refresh the URL in your browser:

http://ubuntu/tms

You should see a response "Hello from Sparkle!"

In the next part (the final one) we will add the XData module to our Apache module.

TMS XData REST Server on Linux - Step by Step - Part 5

$
0
0

This is part 5 of the tutorial on how to create TMS XData and TMS Sparkle servers on Linux. On Part 4, we have added Sparkle to our Apache module, preparing it to receive any modules we want to add. And in this final part we will add the TMS XData module to it.

Here is video for part 5: Adding the TMS XData module to Apache.


Now that we can add any Sparkle module we want, develop our XData server should be nothing different from when we use Windows. You can find more detailed information about it in other resources (blog posts, our TMS XData documentation, etc.). This tutorial will just cover the basics and deal with some final Linux specific things, like SQLite database permissions.

1. Create a new Aurelius connection for SQLite database

Go to Delphi menu item "File, New, Other...", then "Delphi Projects, TMS Business, TMS Aurelius DB Connection" to open the wizard. Choose "SQLite" for both driver and SQL dialect, and then confirm to create the new connection. Unit name created will be called "ConnectionModule".

2. Add XData Module to Sparkle server

Going back to WebModule1 unit, add the following units to the uses clause:

uses
   {...}, XData.Server.Module, ConnectionModule, Aurelius.Engine.DatabaseManager;

Now remove the Sparkle anonymous module we have added just for testing in previous part 4 of this tutorial, and add the new XData module. Also, let's do a call to TDatabaseManager.Update so our tables and columns are created in the database if needed. The final code of initialization/finalization part of our unit should be like this:

initialization
  Server := TWebBrokerServer.Create;
  TDatabaseManager.Update(TSQLiteSQLiteConnection.CreateConnection);
  Server.Dispatcher.AddModule(TXDataServerModule.Create(
    'http://ubuntu/tms', TSQLiteSQLiteConnection.CreateConnection
  ));
finalization
  Server.Free;
end.

3. Define SQLite database location

The two steps above should be enough to get our XData server up and running (yep, only those). But our server connects to a database, and we have chosen to use SQLite. We must then define the location of our SQLite database, and specifically on Linux, we should create and set permissions on it so Apache module can read and write to the database.

Let's go back to the ConnectionModule unit created by the wizard, and change the location of SQLite database by changing the parameter in the TSQLiteSQLiteConnection.CreateConnection function:

class function TSQLiteSQLiteConnection.CreateConnection: IDBConnection;
begin
  Result := TSQLiteNativeConnectionAdapter.Create('/home/user/xdata/xdata.db');
end;

In our example, the SQLite database will be the xdata/xdata.db file in our home folder. You might need to change that location a little bit if you have a different user name on Linux.

4. Create SQLite database on Linux and give proper permissions

Now let's go back to Linux terminal and create the database. Make sure you are in your home directory (you can use "cd" command for that):

cd
mkdir xdata
touch xdata/xdata.db

Now, we need to give Apache access to our database. On Ubuntu, Apache module runs under "www-data" group. This will work here if you are following this tutorial from the very beginning, but it can vary depending on the Linux flavor you are using or other Apache settings. In our case, we will change the group of our xdata folder and all its content to "www-data":

sudo chgrp www-data xdata -R


5. Install SQLite library

Our XData module in Apache will use SQLite to access the database. We must then install SQLite libraries for it to do that. If we were using any other database, like MySQL, PostgreSQL, etc., we would might need to install proper client libraries for them as well. Use the following command to install SQLite library:

sudo apt-get install libsqlite3-dev


6. Rebuild, deploy and restart Apache

All is done. We just have to rebuild our Apache module, deploy it again on Linux, and restart Apache on Linux like we did before in previous parts of this tutorial:

sudo apache2ctl stop
sudo apache2ctl start

And our XData server should be running at root address "http://ubuntu/tms"!

This is the end of this tutorial, I hope it was useful for you. From now on, developing further the XData server is no different than developing for Windows. The video above shows more steps further, like creating an entity in the server and doing some CRUD operations on it.

And of course, for further information on TMS XData, please refer to the XData web page or XData documentation.

Viewing all 1006 articles
Browse latest View live


<script src="https://jsc.adskeeper.com/r/s/rssing.com.1596347.js" async> </script>