
We're excited and proud to announce the availability of the 3rd major release of TMS WEB Core v1.2 Padua. An enormous amount of work was done between the TMS WEB Core v1.1 Verona release and TMS WEB Core v1.2 Padua.
Tons of work was done on many levels: Object Pascal to JavaScript compiler improvements, new web frameworks & controls support, new UI components, improved IDE integration. There is in fact so much enhanced and added that it is too much to list here in detail. TMS WEB Core v1.2 has been 6 months in the works and we'd like to highlight the major new features here:
Latest pas2js compiler integration
With the newest version of the compiler, there is now support for for anonymous methods, class helpers, advanced records. Only two major features are in front of the compiler team to reach parity with the Delphi compiler being generics and attributes and work on generics has already started.
Electron target support

A new application type that can be choosen to create cross-platform desktop applications for Windows, macOS, Linux is available now in TMS WEB Core. Generating desktop applications with fantastic looking HTML/CSS based GUIs is as simple as choosing the Electron application type and use OO and RAD to create your application.
Support for Lazarus 2.x
TMS WEB Core can now also be used & installed from Lazarus v2.0.2
3D chart, math chart, objects and scenes support

Creating 3D business charts, math charts, render 3D scenes with objects and models is thanks for several components wrapping WebGL/ThreeJS easier than ever. Several samples are included that show this incredible web technology.
Camera control component & QR code + barcode decoder component
Now it is possible to directly control the device camera(s) from your web application and take pictures, record video and even scan QR and barcodes.
File picker for local file retrieval
The new file picker & file upload control allow for easy access to local files. Loading text files, images files, binary files from the local file system takes just a few lines of code.
Responsive grid panel
A new control, the TWebResponsiveGridPanel is available and with this new control, it is easy to create responsive UIs from the Delphi IDE form designer. It allows to set layouts depending on screen sizes. As a TWebResponsiveGridPanel can also be used inside another TWebResponsiveGridPanel, really complex responsive behaviours can be defined at design-time.
Audio capture component
Recording & storing audio from the webbrowser is possible thanks to a new component added for this. A dictaphone demo applications is added that demonstrates this.
TWebTreeview & TWebAccordion component

Two new pure HTML element based controls that offer a treeview and accordion UI control are added. The TWebTreeView has a component interface as similar as possible to the standard VCL TTreeView.
IndexedDB access classes and TWebIndexedDBClientDataSet component
Applications can now also take advantage of the browser built-in IndexedDB for temporary or permanent storage. A Pascal class is added to use the IndexedDB database and an even easier to use TWebIndexedDBClientDataSet is available now to hook up DB-aware controls to the IndexedDB tables.
Syntax highlighting editor control added

A new memo control with syntax highlighting is now also part of TMS WEB Core. With this memo, it is now possible to edit Object Pascal code (or code in other programming languages) with a syntax highlighting editor. This component takes advantage of the popular open source ACE web syntax highlighting editor.
Easier browser target selection with the TMS browser selector toolbar for the Delphi IDE

From a new IDE toolbar, the browser in which you want to run the TMS WEB Core application from the IDE can be selected
Grid checkbox cell & column support
The TWebStringGrid and TWebDBGrid got new capabilities such as adding checkboxes to cells, mixing DB-bound and non-DB bound columns, sorting, DB indicator ...
Child order control for relative control rendering
Creating page layouts with relative control usage is now also better under control with the ChildOrder property for UI controls that controls the relative positioning order of the control on the page or within parent elements.
Wrapper component for DIV and SPAN
Parts of a UI design can now be mapped easier onto HTML DIV or SPAN elements in a HTML template
Other than these highlights, there are numerous smaller improvements and extensions. We are already curious to learn how all the new capabilities will be used in your powerful web client applications!
Note that from now till June 30, 2019, we also have several promotional actions to get started with TMS WEB Core v1.2 in combination with TMS FNC Cloud Pack, TMS FNC Cloud Studio, with a TMS BIZ backend or jump to our highest level, the TMS ALL-ACCESS level.
Meanwhile, our Mille Migla RADical web race continues and after leaving Padua, we are heading to Ferrara now.
The improvements and features for the next version TMS WEB Core v1.3 Ferrara are being defined now and promise to be yet another big step forward in easy OO RAD based web development for Delphi developers. We are equally eager to learn from you what you'd like to see in TMS WEB Core v1.3 Ferrara. Get in touch and let's discuss!
↧
TMS WEB Core v1.2 Padua is released. Going to Ferrara now!
↧
TMS WEB Core v1.2 first tips and tricks : working with local files
In a regular web client application, it is normal that there is no direct access to the local file system. If that would be possible, it would obviously be a huge security breach. This is possible though in an Electron desktop cross platform application for Windows, Linux, macOS but we'll cover that in a follow-up article.
Working with local files from a regular web application requires consent/interaction from the user. To get access to a local file, the user needs to take action and select the local file he wants to share with the web client application running in the browser. The web client application can invoke a file download that will then be persisted on the local file system.
Opening local files
Both save and load operations can be easily done for text files or binary files. A text file is loaded simply as string while a binary file can be opened as a JavaScript byte array buffer or a base64 encoded string.
To do this with TMS WEB Core, you can use a TWebFilePicker on the form and implement the OnChange event. The OnChange event is triggered when the user has selected a file (or multiple files when WebFilePicker.MultiFile = true).
From this event handler, we can access the selected files via the WebFilePicker.Files collection. This returns objects holding the filename, the mimetype, file size and file modified date. The file can be programmatically loaded by calling File.GetFileAsText, File.GetFileAsBase64, File.GetFileAsArrayBuffer. The browser will then asynchronously load the local file and it will be returned by the TWebFilePicker component via the events OnGetFileAsText, OnGetFileAsBase64, OnGetFileAsArrayBuffer.
Example: load a text file:
procedure TForm1.WebFilePicker1Change(Sender: TObject);
begin
  WebFilePicker1.Files[0].GetFileAsText;
end;

procedure TForm1.WebFilePicker1GetFileAsText(Sender: TObject;
  AFileIndex: Integer; AText: string);
begin
  WebMemo1.Lines.Text := AText;
end;
Example: load an image file:
procedure TForm1.WebFilePicker1Change(Sender: TObject);
begin
  WebFilePicker1.Files[0].GetFileAsBase64;
end;

procedure TForm1.WebFilePicker1GetFileAsBase64(Sender: TObject;
  AFileIndex: Integer; ABase64: string);
var
  imgbase64: string;
begin
  imgbase64 := 'data:image/png;base64,' + ABase64;
  WebImageControl1.URL := imgbase64;
end;
Note 1
For the dialog to open files, we can also set the file filter via the WebFilePicker.Accept property. This is a string property that sets the HTML INPUT FILE element accept attribute. This can set the file extension or it has predefined values for specific file types like image files. If you set Accept= 'image/*', it would allow to pick .JPG, .GIF, .BMP, .PNG files. To pick a .TXT file only, set Accept = '.txt'.
Example of the open dialog from Chrome with Accept='.txt,.html'
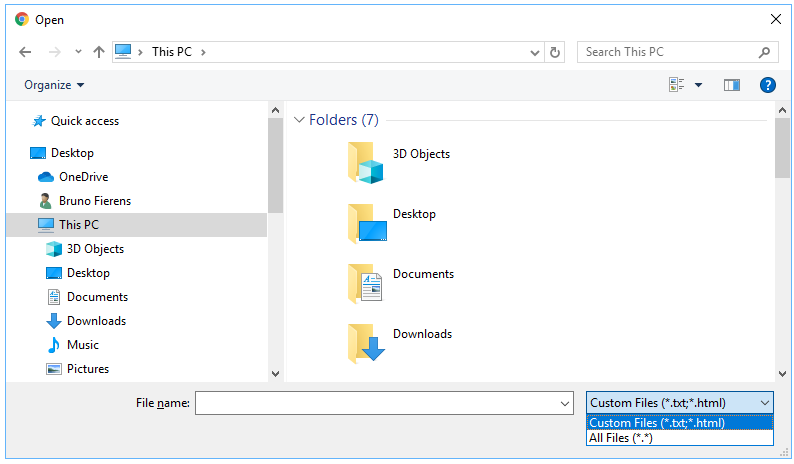
For more information see: https://www.w3schools.com/tags/att_input_accept.asp
Note 2
These operations are equally possible with the TMS WEB Core TWebFileUpload component. The difference is that TWebFileUpload also offers drag & drop. That is, the user can drag a file out of from the local file system (Window Explorer on Windows operating systems) and this will trigger the OnChange event from where the client application can use the same code to get to the data of the local flie.
Saving to the local file system
To save files, i.e. cause the browser to download the file to the local file system, the TMS WEB Core Application object offers the methods:
Application.DownloadTextFile(AText: string; AFileName: string);

Application.DownloadBinaryFile(Data: TJSUInt8Array; AFileName: string);
If we would want to save the content of a TWebRichEditor to a HTML file on the local file system, we can as such write:
procedure TForm3.WebButton1Click(Sender: TObject);
begin
  Application.DownloadTextFile(WebRichEdit1.Text, 'myfile.html');
end;
In a next tips & tricks blog, we'll discuss direct local file access from an Electron desktop application generated from TMS WEB Core on Windows, macOS and Linux using a single code base.
↧
↧
TMS WEB Core v1.2 tips & tricks part 2 : file access from Electron apps
In the previous blog article, we showed how the TWebFilePicker or TWebFileUpload component in TMS WEB Core are the intermediates to get read access to local files and how the Application.Download* methods can be used to write data back to the local file system. These mechanisms are required because the web application runs in the secure browser sandbox.
For Electron apps, which are native desktop executable applications running on Windows, macOS64 or Linux, this is different and via Electron direct local file access is possible. From a TMS WEB Core application we have enabled a couple of easy to use methods to access such local files.
Read and write text files
To make it easy, the TElectronStringList class is available where the TElectronStringList.SaveToFile() / TElectronStringList.LoadFromFile() methods will directly read or write text files on the local device filesystem.
As such, it is possible to load a TWebRichEdit from a local HTML file directly via:
var
  LEsl: TElectronStringList;

begin
  LEsl := TElectronStringList.Create;
  try
    LEsl.LoadFromFile('myappmyhtmlfile.html');
    WebRichEdit1.Lines.Assign(LEsl);
  finally
    LEsl.Free;
  end;
end;
Note that here the file can be directly accessed using a file path. No user consent to access this file is required.
We can however still use an operating system file open dialog to pick the file. The open dialog which uses the respective operating system specific dialog on Windows, macOS, Linux allows to browse and select a file. We took care to make the component to enable this as similar as possible as the standard VCL TOpenDialog.
After dropping a TElectronOpenDialog on the form the code becomes:
var
  LEsl: TElectronStringList;

begin
  If ElectronOpenDialog1.Execute then
  begin
    LEsl := TElectronStringList.Create;
    try
      LEsl.LoadFromFile(ElectronOpenDialog1.FileName);
      WebRichEdit1.Lines.Assign(LEsl);
    finally
      LEsl.Free;
    end;
  end;
end;
Read and write binary filesWhile the TElectronStringList offers a great and easy to use way to work with text files, the TElectronBinaryDataStream gives access to any file type on the local file system. Using TElectronBinaryDataStream, the file can be retrieved as string but now additionally the data can be retrieved as base64 string or as JavaScript array buffer.
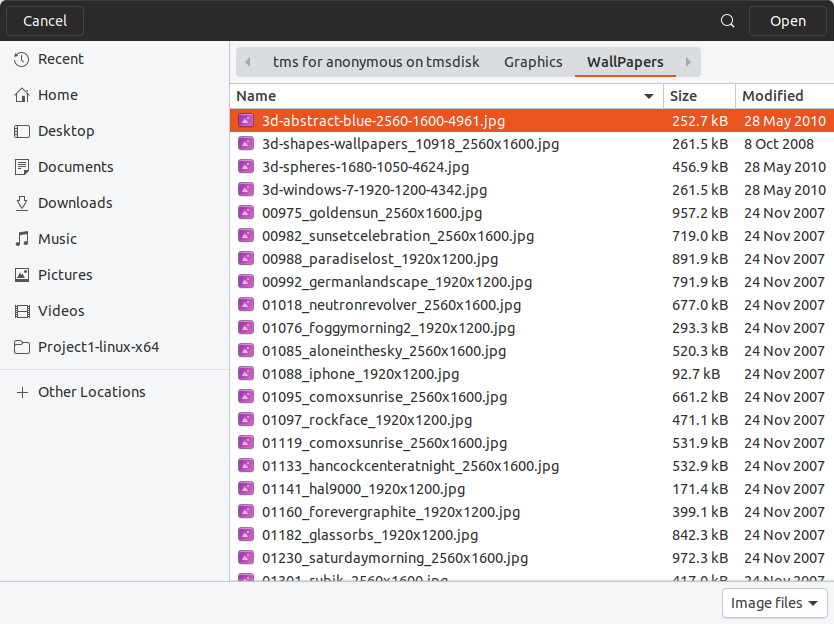
In this example code snippet, a JPEG image file is read from the local file system and displayed via a TWebImageControl
var
  LEbs: TElectronBinaryDataStream;

begin
  ElectronOpenDialog1.Filters := 'Image files|*.jpg;*.jpeg';
  If ElectronOpenDialog1.Execute then
  begin
    LEbs := TElectronBinaryDataStream.Create;
    try
      LEbs.LoadFromFile(ElectronOpenDialog1.FileName);

      WebImageControl.URL := 'data:image/jpeg;base64,' + LEbs.Base64;
    finally
      LEbs.Free;
    end;
  end;
end;
As you can see, with TMS WEB Core and Electron you can create fully cross-platform desktop applications for Windows, macOS, Linux. You can benefit from the powerful HTML/CSS rendering to create spectacular user interfaces and still have a single code base solution for 3 operating systems. Just like Visual Studio Code, Atom, Skype, WordPress, Slack have Electron based cross platform applications, yours can be too.Don't miss out and get started today with TMS WEB Core! You can download the trial version, go ahead with the standalone version you purchased or with TMS WEB Core and additional tools that are all included in TMS ALL-ACCESS. Our team looks forward to all your comments, feedback, feature-requests to help steering the development of TMS WEB Core to the next stages!
↧
TMS XData 4.5: Parameter Binding and SwaggerUI
TMS XData 4.5 has been released with two major new features: parameter binding and Swagger UI.
SwaggerUI is a great new addition, just by setting two simple properties:
XDataModule1.SwaggerOptions.Enabled := True;
XDataModule1.SwaggerUIOptions.Enabled := True;
A new endpoint "swaggerui" is added to your API. Just navigate to it and you will get the nice SwaggerUI which automatically displays all your API endpoints, how they should invoke, which parameters they receive, and even more, test it right away, from the browser:

Parameter Binding
Flexible parameter binding via attributes is another nice addition that provides you more control on how the API method must be invoked via raw HTTP requests - note that if you use Delphi XData Client or TMS Web Core XData Web Client, this is transparent to you, you just specify the method and parameter, and binding and routing is automatic.
But if you intend to call your API from non-Delphi platforms, you can now fully control how it works. You can declare methods like this:
  procedure Process(
    [FromPath] PathA: Integer;
    [FromQuery] QueryA: string;
    BodyA, BodyB: string;
    [FromQuery] QueryB: Boolean;
    [FromPath] PathB: string;
  ): double;
And that means the action would be invoked with a request like this:
POST /tms/xdata/MyService/Process/5/value?QueryA=queryvalue&QueryB=true HTTP/1.1

{
  "BodyA": "one",
  "BodyB": "two"
}
Note how FromPath, FromQuery (and implicit FromBody) parameter changes the parameter binding so that the API knows that PathA and PathB parameters are 5 and value respectively (coming from the URL path), QueryA comes from the query string, and BodyA and BodyB comes from JSON in request body.
If you want to see both parameter binding and SwaggerUI in action, take a look at this new video about it:
↧
TMS WEB Core v1.2 tips & tricks part 3 : Handling multiple forms with TApplication
The class TApplication has been part of Delphi since its inception. TMS Web Core tries to make as little changes to your development as possible. Thus, it provides its own method helper class to TApplication to provide additional functionality that will help you to control and react to events in your web application.
TApplication = class(TControl)
  private

  public
    //
    function CreateNewForm(AInstanceClass: TFormClass): TCustomForm; overload;
    function CreateNewForm(AInstanceClass: TFormClass; AElementID: string): TCustomForm; overload;
    procedure CreateForm(AInstanceClass: TFormClass; var AReference); overload;
    procedure CreateForm(AInstanceClass: TFormClass; AElementID: string; var AReference); overload;
    procedure CreateForm(AInstanceClass: TFormClass; AElementID: string; var AReference; AProc: TFormCreatedProc); overload;
    procedure CreateForm(AInstanceClass: TDataModuleClass; var AReference); overload;
    procedure CreateForm(AInstanceClass: TFormClass; AElement: TJSHTMLElement; var AReference); overload;
    property ActiveForm: TCustomForm read FActiveForm;
    property MainForm: TCustomForm read FMainForm;

  end;
You have plenty of methods to create a new form. These methods have been extended to fulfill the needs of the asynchronous nature of the web. To be precise, every method overs a callback that can be used to implement code after the form has been created. Of course, every form has its own OnCreate event, but you might want to execute code that is not part of the form after creation. E.g. passing values to the new form.
procedure TForm1.ShowSettings;
var
  LFrm : TFrmSettings;
  // called after form is closed
  procedure AfterShowModal(AValue: TModalResult);
  begin
    // evaluate AValue and get values from form ...
  end;
  // will be called after form has been created
  procedure AfterCreate(AForm: TObject);
  begin
    // pass values to form referenced in AForm ...
  end;
begin
  LFrm := TFrmSettings.CreateNew( @AfterCreate );
  LFrm.ShowModal( @AfterShowModal )
end;
The example above is taken from a TMS Web Core application that features a form with settings. The form is being created and shown. Its values for initialization are passed in AfterCreate. Changes can be persisted in AfterShowModal.
Talking about multiple forms in an app. You can always query the active form that is being displayed using:
LActiveForm := Application.ActiveForm;
Further, to determine the main form of the application use:
LMainForm := Application.MainForm;
↧
↧
TMS WEB Core v1.2 tips & tricks part 4: Display another form as a pop-up
Creating a second form is easy and has been shown in the last post. However, sometimes we might not want to take the other form to take up the whole screen but make it a pop-up window instead.
As its an amazing framework from TMS Software (disclaimer: this statement might be biased), making a new form to display as a pop-up is really easy:
begin
  LFrm := TFrmSettings.CreateNew( @AfterCreate );

  // LFrm als Pop-Up festlegen
  LFrm.Popup := true;

  // Transparenz definieren
  LFrm.PopupOpacity := 0.2;

  LFrm.ShowModal( @AfterShowModal )
end;
The call to CreateNew is no different than for any other form. As an alternative, we just use the TWebForm constructor this time instead of TApplication. However, we can make the necessary property changes after calling the constructor. Be aware, that this is indeed possible in the same method. We do not have to do this in AfterCreate as it affects the object on the application side and has no impact on the creation for the window.
In order to make the new form a pop-up, we set the property Popup to true. We also specify an opacity for the form. 0 means it is completely transparent. 1 means no transparency at all.
We then show the form calling ShowModal. Yet again, this is possible as it tells the framework to show the form when ready. This means, AfterCreate will be called after creation and as soon as the form is ready to be shown, it will be shown. The method AfterShowModal will server as a means to get values from the pop-up window after its been closed.
Thats how easy it is to display a pop-up window using TMS Web Core.
↧
Something I forgot to say about TMS XData 4.5 regarding URL endpoints
Well, actually I didn't forget it. I was just not blog about it.
But since we got a very positive feedback in the last post about new features in TMS XData 4.5, I decided to show you an extra thing, somewhat related to the parameter binding feature:
it's the new EnableKeyAsSegment property.
Basically it controls how the endpoint URL for entities will look like. Let's take the SQLiteConsoleServer demo as an example.
It automatically publishes all tables in the database without a single line of code, as Aurelius entities.
If you run the demo and navigate to the swaggerui address you will see the available endpoints.
In the screeshot below we can see the ones for Album entity:

Now let's see what happens when we set EnableKeyAsSegment property to True:
XDataServer1.EnableKeyAsSegment := True;If you recompile, run the demo again and refresh the browser page to update SwaggerUI interface, here is what you get:

Did you notice the difference?
Yep, the URL format was
/Album(2) - the id enclosed in parenthesis - and now it is /Album/2.
Everything works just as before, and both URL are valid REST addresses, but having the ID in the path is
a more common approach out there and might be easier for you to integrate with existing non-Delphi frameworks.
For entities with composite keys, you put one id in each path segment. For example, suppose you have an entity Order which is identified by CustomerId (string) and OrderNo (integer). Instead of using the URL
/Order(AFKLI,2) you can use /Order/AFKLI/2.
As one final note, when you enble the new URLs, the old ones are still valid. It's not a replacement, but an addition. The exception is in the SwwaggerUI itself, which hides the URLs using parenthesis to not clutter the UI too much.
Hope you liked this one, two!
↧
TMS WEB Core v1.2 tips & tricks part 5: Accessing microphone and camera
Over the years, increasingly new web APIs have given web developers access to areas of the operating system that were originally only accessible from native applications. This is also the case with the microphone and camera that is attached to a desktop computer or integrated in laptops, tablets and smartphones.
As the main vision and mission of TMS WEB Core is to bring OO RAD component based development for web client applications, it is expected that TMS WEB Core also brings easy to use components for using your device microphone or cameras (yes that is plural as it is possible to select between front and back cameras on a mobile device for example) from a TMS WEB Core application.
Security / privacy
An important first remark to make is that before a web client application can access a microphone or camera, user authorization is required. So, clearly, no web client application can secretly in the back listen to your conversations or watch what you are doing! Together with this authorization is also the requirement that the web application comes from a HTTPS URL so there is a reliable identification of the author or company hosting the application possible. So, when your TMS WEB Core application runs from a HTTPS domain and you want to access a microphone or camera, the user will see a prompt to allow this access:

Microphone
To use the microphone, we have introduced the non-visual component TWebMediaCapture. This component can be used to capture audio via the microphone when TWebMediaCapture.Capture is set to mctAudio. The standard recording mode is mrmManual. This means that recording is started by calling WebMediaCapture.Start and the recording is stopped by calling WebMediaCapture.Stop. After the recording is stopped, the data that was recorded is asynchronously returned via the event OnStopCapture that has the event signature:
TMediaCaptureCloseEvent = procedure(Sender: TObject; ABinary: TJSUint8Array; ABase: string) of object;This event returns the audio via a JavaScript array or as a base64 encoded string. An important remark is that different browsers might have a different default audio file format. In the Chrome browser this is the webm format for example, in Firefox it is ogg. With this component, we have created a TMS WEB Core dictaphone app. You can discover this application here: https://download.tmssoftware.com/tmsweb/demos/tmsweb_Dictaphone/
The code to start and stop the recording is simply done from a click on an image:
procedure TForm1.WebImageControl1Click(Sender: TObject);
begin
  if not FRecording then
  begin
    WebMediaCapture1.Start;
    FRecording := True;
    WebImageControl1.URL := GetStopImage;
  end
  else
  begin
    WebMediaCapture1.Stop;
    FRecording := False;
    WebImageControl1.URL := GetRecordImage;
  end;
end;
The code to capture the recorded data is here:procedure TForm1.WebMediaCapture1StopCapture(Sender: TObject;
ABinary: TJSUint8Array; ABase: string);
begin
if WebIndexedDbClientDataset1.RecordCount > 0 then
WebIndexedDbClientDataset1.RecNo := 1;
WebIndexedDbClientDataset1.Insert;
WebIndexedDbClientDataset1.FieldByName('descr').AsString := WebEdit1.Text;
WebIndexedDbClientDataset1.FieldByName('time').AsDateTime := Now;
WebIndexedDbClientDataset1.FieldByName('base').AsString := ABase;
WebIndexedDbClientDataset1.Post;
WebEdit1.Text := 'SoundClip ' + IntToStr(WebIndexedDbClientDataset1.RecordCount + 1);
end;
This code shows another interesting concept, that is to store the recorded audio in an IndexedDB dataset. That is a dataset hosted in your browser which is private and accessible at a later time, so you can listen again to captured audio snippets when you open the web application again at a later time.
One more interesting option is to let the microphone record automatically when a certain audio level is reached. To use the TWebMediaCapture this way, set WebMediaCapture.RecordingMode to mrmAudio. With the properties WebMediaCaptature.Sensitivity, WebMediaRecorder.FFTSize, WebMediaRecorder.SmoothingTimeConstant it can be controlled at what noise level and what duration of the noise level the recording will start and stop.
Camera
Thanks to the new TWebCamera component, taking pictures from a TMS WEB Core web client application is equally easy. Drop the component on the form and start the camera by calling WebCamera.Start. To take a picture, call one of the three properties depending on the format you wish for the captured image data:
property WebCamera.SnapShotAsBase64: string;
property WebCamera.SnapShotAsImageData: TJSImageData;
property WebCamera.SnapShotAsUint8Array: TJSUint8Array;
A very simple use is to call WebCamera.SnapShotAsBase64 and assign the result to a HTML image element, i.e. what is wrapped in TWebImageControl via:
WebImageControl1.URL := WebCamera1.SnapShotAsBase64;The image format returned van be selected between JPEG or PNG with WebCamera.BaseFormat.
As mentioned, TWebCamera can handle multiple cameras. To select a camera, the property WebCamera.CameraType can be used that can select between rear, front or default camera. To detect the cameras available, the TWebCamera.CameraDevices collection can be used. You can use:
for i := 0 to WebCamera.CameraDevices.Count - 1 do
begin
  WebListBox1.Items.Add(WebCamera.CameraDevices[i].Name);
end;
For camera & microphone use, we have published 3 demos you can discover at: https://www.tmssoftware.com/site/tmswebcoreintro.asp#demos There is even a camera demo that integrates with a QR and barcode scanning library so you can detect and decode pictures taken from a QR code or barcode. Of course, the TMS WEB Core distribution contains the full source code of these demos
Discover these and more exciting features in TMS WEB Core that let you create web client applications with unprecedented capabilities.
You can download the trial version, go ahead with the standalone version you purchased or with TMS WEB Core and additional tools that are all included in TMS ALL-ACCESS. Our team looks forward to all your comments, feedback, feature-requests to help steering the development of TMS WEB Core to the next stages!
↧
TMS WEB Core v1.2 tips & tricks part 6: Exploring new TWebDBGrid features
In TMS WEB Core v1.2 Padua, several new features have been added to the TWebDBGrid. This is a DB-aware grid for TMS WEB Core web client applications. Note that TMS WEB Core features a databinding model that is similar to the VCL databinding. There is the concept of a TDataSet, TDataSource and for a DB-aware TWebDBGrid, databinding is done by setting TWebDBGrid.DataSource := yourDataSource.
So, what is new in TWebDBGrid in TMS WEB Core v1.2:
- A new DB row indicator is added. This row indicator not only shows the active record but also the dataset state.
- New column types: cdCheck, cdLink, cdExternalLink, cdRadio, cdImage other than the default cdText type
- Column sorting and sort direction indication in the column header
Together with many improvements in dataset handling itself, this opens up for more powerful DB applications with a minimum amount of code.
Row indicator
When grid.FixedCols = 1 and grid.ShowIndicator = true, the first fixed column is used to show a row and dataset state indicator. This is the standard triangle when the dataset is in browse state and a stylus when the dataset is in editing state
Column types
Now, a column can automatically display checkboxes, radiobuttons, hyperlinks or images without adding any code. When the column type is set to cdCheck, the column will render as a checkbox. The checkbox state will be checked when the DB field value is Y,TRUE or 1 and as expected it will be unchecked for N,FALSE or 0. Note that when the grid is not editable, the checkbox will be displayed disabled. When the grid is editable, a click on the checkbox will trigger the event OnCheckClick from where further actions could be done.
When the column type is set to cdImage, the DB field value is consider the hyperlink to the image and the grid will automatically render this as an image. Note that when the DB field does not contain the full correct hyperlink, the DBField.OnGetText event handler can be used to return a full image link. Finally, there is also the cdLink, cdExternalLink column type. When this type is chosen, the DB field text is rendered as a hyperlink with or without the target attribute respectively. Also here, when the DB field doesn't store a fully qualified hyperlink, the DBField.OnGetText event handler can be used to transform the DB field text value to a fully qualified hyperlink.
Column sorting
Column sorting is triggered from a column header click. The column header click will trigger the event OnFixedCellClick. From this event, code can be added to sort the dataset and to show a sort indicator in the column header.
To set a sort indicator in a column header, the property grid.Columns[Column].SortIndicator can be used. The values can be siNone, siAscending, siDescending.
Putting it all together
In the new TWebDBGrid, these new capabilities are demonstrated. For a quick setup and convenience, the grid is bound to a dataset at URL: http://www.tmssoftware.biz/tmsweb/demos/TMSWEB_ResponsiveGrid/carsfull.json This dataset contains a column with images, one with an URL and one with a checkbox. At designtime, set the URL to WebClientConnection.URL and connect a WebClientDataSet.Connection to WebClientConnection. After this, right-click the dataset and select "Fetch fields". This will at design time fetch the JSON and extract the columns information. When this is done, the columns you want ot show in the grid can be added to the TWebClientDataSet fields collection by opening the editor for the TWebClientDataSet context menu and adding the desired fields from there. Then connect to TWebClientDataSet to the TWebDataSource and the TWebDataSource to TWebDBGrid.DataSource and the columns will be displayed.
To show pictures for the Picture column, set for this column Column.DataType = cdImage, for the checkbox column set it to cdCheck and for the URL column set it column.DataType to cdExternalLink.
Note that in the sample JSON, the image is a simple short image name, not a fully qualified URL. We use the DBField.OnGetText to make it a proper real & fully qualified URL:
procedure TForm1.WebClientDataSet1PictureGetText(Sender: TField;
  var Text: string; DisplayText: Boolean);
begin
  Text := 'http://www.tmssoftware.biz/tmsweb/demos/TMSWEB_ResponsiveGrid/img/' + StringReplace(Sender.AsString, '.jpg', '_96.jpg', [rfReplaceAll]);
end;
Similar for the URL column that doesn't contain by default a HTTP prefix:
procedure TForm1.WebClientDataSet1URLGetText(Sender: TField; var Text: string;
  DisplayText: Boolean);
begin
  Text := 'https://' + Sender.AsString;
end;
Now, let's finish by adding column sorting. The column sorting is triggered from the OnFixedCellClick event handler.
In this event handler, we basically figure out the column clicked, determine the sort order (i.e. toggle on each click) and added the index to the TWebClientDataSet and make the index active:
This code is:
procedure TForm1.WebDBGrid1FixedCellClick(Sender: TObject; ACol, ARow: Integer);
var
  LIndex: string;
  desc: boolean;
  opt: TIndexOptions;
begin
  if ACol = 0 then
    Exit;

  Lindex := 'By'+ WebDBGrid1.Columns[ACol - 1].DataField;

  // toggle sort order when the same column is clicked
  desc := SameText(webclientdataset1.ActiveIndex, LIndex);

  if desc then
    LIndex := LIndex + 'Desc';

  opt := [];

  if desc then
    opt := opt + [siDescending];

  // clear any previous indexes and add the new index to sort
  webclientdataset1.Indexes.Clear;
  webclientdataset1.Indexes.Add(LIndex, WebDBGrid1.Columns[ACol - 1].DataField, opt);
  webclientdataset1.ActiveIndex := LIndex;

  // set the sort indicator in the grid column header
  if ixDescending in webclientdataset1.Indexes.Find(Lindex).Options then
    WebDBGrid1.Columns[ACol - 1].SortIndicator := siDescending
  else
    WebDBGrid1.Columns[ACol - 1].SortIndicator := siAscending;

  // force the grid to update
  WebDataSource1.DataSet :=  WebClientDataSet1;
end;
Live, this shows in Chrome like:
or better, explore and play with the live demo.
Discover these and more exciting features in TMS WEB Core that let you create web client applications with unprecedented capabilities.
You can download the trial version, go ahead with the standalone version you purchased or with TMS WEB Core and additional tools that are all included in TMS ALL-ACCESS. Our team looks forward to all your comments, feedback, feature-requests to help steering the development of TMS WEB Core to the next stages!
↧
↧
TMS WEB Core v1.2 tips & tricks part 7: Get Base64 encoding for images
Not so long ago, I posted about how to convert an image into a Base64 string. Today, I will show you that using TMS Web Core, this is even easier.
If we look into the source code of TMS Web Core, we find that the custom image control adds a public property called Base64Image of type string. That means, we can read the Base64 string of an image using that property. However, this is a read-only property. You cannot assign a Base64-string to it in order to assign image data. I will show a different approach how to work with Base64-strings for images in one of my next posts.
  TCustomImageControl = class(TCustomControl)
    // ...
  public
    // ...
    property Base64Image: string read GetBase64Img;
  end;
Lets try this functionality. Drop (1) a TWebImage (WebImage) and a (2) TWebMemo (WebMemo) on the form.

Implement the OnCreate event of the form as follows to load an image and assign its Base64 representation to the memo:
procedure TForm1.WebFormCreate(Sender: TObject);
begin
  WebImage.URL :=
    'https://images.pexels.com/photos/' +
    '2355519/pexels-photo-2355519.jpeg';
  WebMemo.Lines.Text := WebImage.Base64Image;
end;
Running the application results in the following app in the web browser:

Note that we can also assign a URL to the web image component in order to load an image.
↧
TMS WEB Core v1.2 tips & tricks part 8: 3D Charts made easy
One of the big new features in TMS WEB Core v1.2 Padua is the built-in support for 3D graphics. This is accomplished by providing Object Pascal components and classes that wrap the powerful ThreeJS / WebGL libraries for rendering 3D graphics in the browser. This technology is meanwhile supported on every mainstream browser, including on mobile devices.
As always, the goal of TMS WEB Core is to offer OO RAD Component based we development, so, integrating 3D graphics in your TMS WEB Core web client applications becomes a piece of cake. So, let's immediately jump to writing the code as an inspiration to get you started exploring the wonderful 3D web world.
When interfacing with an existing JavaScript libraries is done from a TMS WEB Core application, we have made it equally easy to setup the link references to these libraries. In case of 3D we will need the ThreeJS library. So, from the project context menu in the Delphi IDE select "Manage JavaScript Libraries" and from there check to use ThreeJS.

Next, put a TWebThreeJSChart on the form and you can start defining series for your chart. Since climate change is a bit a "hot" topic (pun intended) in the last years everywhere, for our sample we got the idea to render the average month temperatures in Belgium (where our main TMS office is located) for the past 3 years. We got the data from a website that lists the temperature measurements since 1833. You can find the data here.
The series we want to display are a series with all months of the year and a series for years. A series is of the type TThreeJsChartSeries and is created with the X and Y axis labels via:
var
  aSeries: TThreeJsChartSeries;

begin
  aSeries := TThreeJsChartSeries.Create(
   TJSArray.New('Jan','Feb','Mar','Apr','May','Jun','Jul','Aug','Sep','Oct','Nov','Dec'),
   TJSArray.New('2017', '2018', '2019'));
end;
As you can see, we can create in Object Pascal a dynamic JavaScript array that ThreeJS needs via TJSArray.New(values). Next, let's add values for each month for the 3 years to the series. This is done for a month via:
aSeries.addLegendRow('Jan', TJSArray.New(1.1, 6.0, 3.0));Other than this, all we need is to setup things like title, X-axis label, Y-axis label, Z-axis label, Z-axis maximum and step value and the formatting of the values along the Z-Axis. When this is ready, to display the series, we simply clear any possible previous series that were setup and then assign the series created and call WebThreeJsChart.createChart.
One more property available in a series is the property TThreeJsChartSeries.ChartType. The 3D chart supports following types: ctBarChart, ctCylinderChart, ctConeChart, ctLineChart, ctAreaChart.
The total code becomes:
procedure TForm1.InitChart(AType: TThreeJSChartType);
var
  aSeries: TThreeJsChartSeries;
begin
  aSeries := TThreeJsChartSeries.Create(
    TJSArray.New('Jan','Feb','Mar','Apr','May','Jun','Jul','Aug','Sep','Oct','Nov','Dec'),
    TJSArray.New('2017', '2018', '2019')
  );

  aSeries.addLegendRow('Jan', TJSArray.New(1.1, 6.0, 3.0));
  aSeries.addLegendRow('Feb', TJSArray.New(6.1, 0.8, 7.0));
  aSeries.addLegendRow('Mar', TJSArray.New(9.6, 5.4, 8.5));
  aSeries.addLegendRow('Apr', TJSArray.New(8.8, 13.0, 11.0));
  aSeries.addLegendRow('May', TJSArray.New(15.5, 16.3, 12.0));
  aSeries.addLegendRow('Jun', TJSArray.New(19.2, 18.1, 0));
  aSeries.addLegendRow('Jul', TJSArray.New(18.3, 22.0, 0));
  aSeries.addLegendRow('Aug', TJSArray.New(18.1, 19.4, 0));
  aSeries.addLegendRow('Sep', TJSArray.New(14.1, 15.4, 0));
  aSeries.addLegendRow('Oct', TJSArray.New(13.3, 12.6, 0));
  aSeries.addLegendRow('Nov', TJSArray.New(6.6, 7.4, 0));
  aSeries.addLegendRow('Dec', TJSArray.New(4.4, 5.8, 0));

  aSeries.valueAxisMarkMaximum := 30;
  aSeries.valueAxisMarkStep := 5;
  aSeries.ChartType := AType;
  aSeries.valueFormatFloat := '#,##0°C';
  aSeries.Title := 'Average month'#13#10'temperatures Belgium';
  aSeries.ValueAxisTitle := 'Temp';
  aSeries.LegendAxisTitle := 'Months';
  aSeries.CategoryAxisTitle := 'Year';

  WebThreeJsChart1.Series := aSeries;
  WebThreeJsChart1.clearChart;
  WebThreeJsChart1.createChart;
end;
Finally, we want to add one more additional tip and that is a frequently asked question how we can easily center a control in the browser window using pure Object Pascal code instead of what is in web development more commonly done using HTML/CSS. Well, the good news is that in Object Pascal this is also very easy. Add an event hanlder for Form.OnResize and write the code:
procedure TForm1.WebFormResize(Sender: TObject);
begin
  if WebThreeJsChart1.Width < Width then
  begin
    WebThreeJsChart1.Left := (Width - WebThreeJsChart1.Width) div 2;
  end;
end;
This results in the chart with the numbers we have till now, May 2019:

or better discover it live here
There is much more than doing just 3D charts with ThreeJS and TMS WEB Core, there are also samples for creating surface charts, show 3D model files or setup your own 3D scenes. Discover these and more exciting features in TMS WEB Core that let you create web client applications with unprecedented capabilities.
You can download the trial version, go ahead with the standalone version you purchased or with TMS WEB Core and additional tools that are all included in TMS ALL-ACCESS. Our team looks forward to all your comments, feedback, feature-requests to help steering the development of TMS WEB Core to the next stages!
↧
Free Books to Learn more about Web Development
Web Development still feels new to a lot of Delphi developers as Delphi is known for desktop and database application development. Most developers also feel overwhelmed where to start.
I just noticed that Packt Publishing Limited offers several of their PDF books for free to get you started on a certain subject and Web Development is one of them. So, if you are thinking to look deeper into Web Frameworks and Delphi using TMS Web Core, the following books might prove to become an affordable, valuable resource. Offered for free are:
Thinking in HTML by Aravind Shenoy

Thinking in CSS by Aravind Shenoy

Thinking in JavaScript by Aravind Shenoy

Practical Web Development by Paul Wellens

AngularJS Essentials by Rodrigo Branas

What You Need to Know about NodeJS by Bruno Joseph Dmello

↧
Ate too much candy? Calculate and export your BMI to PDF with FNC for the WEB!
Ate too much candy?
We all have those moments in life where we are proud of what we have achieved, be it in sports, school, at work... . Whenever we have reached a goal, were hard work lies at the base of it, we tend to reward ourselves with something that makes us even more excited of what we have achieved. For me, that something is candy. I know, I should be eating less of it, but hey!, I have earned it! As I'm obviously eating too much of it, I created a BMI calculation app to track if I should stop eating, or if there is still room for one tiny sweet piece of candy.FNC for the web!
The application, which calculates the BMI, is written with the help of TMS FNC UI Pack, TMS FNC Dashboard Pack and TMS WEB Core and is running in the webbrowser. It allows entering your name, height (cm) and your weight (kg). The calculate button will indicate your BMI in the grid, allowing you to know if you should loose or gain some weight, or if you are absolutely perfect.
PDF for the web!
The BMI application is allowing you to export your data to PDF. Typically, when generating a report, invoice, or any other PDF data file in the browser, this is done on a back end server. The costs to handle the load, scalability can quickly rise and the maintenance gives a lot of headaches. With the TTMSFNCPDFLib and TTMSFNCGraphicsPDFIO components that are both used in the BMI application you no longer need a backend to generate a PDF in your web application. The components completely generate the PDF at the client-side (front end).The TTMSFNCPDFLib component is used to generate the PDF, and the TTMSFNCGraphicsPDFIO component is a bridge to export FNC UI controls such as the TTMSFNCPlanner, TTMSFNCGrid, TTMSFNCChart and many more. In the BMI web application, both are used to combine the custom PDF exporting capabilities with the TTMSFNCGrid and TTMSFNCWidgetGauge components.
The code behind this is actually very simple.
procedure TPDFLibBMILogic.GeneratePDF;
var
  fn: string;
  o: TTMSFNCPDFIOExportObjectArray;
  r: TTMSFNCPDFIOExportRectArray;
  ms: TMemoryStream;
begin
  {$IFDEF ANDROID}
  fn := TPath.GetSharedDocumentsPath + PathDelim + 'BMI.pdf';
  {$ENDIF}
  {$IFDEF MACOS}
  fn := TPath.GetDocumentsPath + PathDelim + 'BMI.pdf';
  {$ENDIF}
  {$IFNDEF ANDROID}
  {$IFNDEF MACOS}
  fn := 'BMI.pdf';
  {$ENDIF}
  {$ENDIF}
  p.Options.Header := 'BMI Report for ' + FName;
  SetLength(o, 2);
  o[0] := FGauge;
  o[1] := FGrid;
  SetLength(r, 2);
  r[0] := RectF(50, 180, 50 + FGauge.Width, 180 + FGauge.Height);
  r[1] := RectF(50 + FGauge.Width + 50, 180, 50 + FGauge.Width + 50 + FGrid.Width, 180 + FGrid.Height);
  ms := TMemoryStream.Create;
  try
    p.Save(ms, o, r);
    ms.SaveToFile(fn);
    {$IFNDEF WEBLIB}
    TTMSFNCUtils.OpenFile(fn);
    {$ENDIF}
  finally
    ms.Free;
  end;
end;
The result, when clicking on the "Export To PDF" button, is shown below

Play with the demo yourself!
Curious on how the demo works, or if you want to know if you can eat more candy? Below is a link that shows the demo live! Note that the components, demo is currently not yet released, but we are working hard on a beta of FNC that is coming real soon, so stay tuned!https://download.tmssoftware.com/tmsweb/demos/TMSWeb_FNCPDFLib_BMI/
↧
↧
TMS WEB Core: Integrating the Froala Editor
How to integrate a JavaScript component into TMS WEB Core
As a proof of concept, this article describes how easy it is to achieve a basic integration of the Froala Editor into TMS WEB Core.

Getting started
Add a link to the Froala CSS and the JavaScript library.- Download Froala Editor
- Add the required CSS and JS files to the project folder
- Embed a link in the project's HTML file
<link href="css/froala_editor.pkgd.min.css" rel="stylesheet" type="text/css"/>
<script type="text/javascript" src="js/froala_editor.pkgd.min.js"></script>
Setup the Froala Editor
Now that the JS file is added, we have access to the Froala Editor library- Declare an external function so we can use Object Pascal to create the Editor Object
- Create an object that links the Froala Editor events with the WEB Core event handlers
- Initialize the Froala Editor
var
  FEvents: TJSObject;
  FFroalaEditor: TJSObject;
  function froalaEditor(s: string; jsObject: TJSObject): TJSObject; overload; external name 'new FroalaEditor';

begin
    FEvents := new([
     'contentChanged', @HandleChanged,
     'initialized', @HandleLoaded,
     'focus', @HandleStartEdit,
     'blur', @HandleEndEdit
     ]);

    FFroalaEditor := froalaEditor('div#' + ElementID,	new([
      'toolbarInline', false,
      'events', FEvents
      ]));
end;
Two modes
There are two ways to use the Froala Editor:Classic
Display the Froala WYSIWYG HTML Editor in your TMS WEB Core project.
This is the default behaviour.

Inline
Connect any TWebLabel to the TWebFroalaEditor component to instantly make it editable in the browser.
  WebLabel1.EventStopPropagation := [];
  WebFroalaEditor1.Visible := False;
  WebFroalaEditor1.InlineEditing := True;
  WebFroalaEditor1.Editor := WebLabel1;

Live demo and source code
View the live demo
Download the full source code
Note: TMS WEB Core v1.2.3.0 or newer is required.
Install Notes:
The ZIP file contains two folders:
- The "Component Library Source" folder: Build and install the package file "TMSWEBFroalaEditor"
- The "Core Source" folder:
- Option 1: Copy the PAS file to the "Core Source" subfolder of the TMS WEB Core install folder
- Option 2: Add the path of the folder to the TMS WEB library path. (in the Delphi IDE: Tools>Options>TMS WEB>Library Path)
↧
One Codebase - Multiple Targets
FNC
This week we focused on FNC, with a series of media content, brought to you via Facebook, Twitter, blog posts and other media channels. We wanted to focus on what FNC is by highlighting each framework and its corresponding operating systems individually. Here is a sample of what this looks like for the WEB.
We plan on using this for communication, promotion, technical articles, and we believe this will allow you, as a customer, have a better understanding on what FNC is. Below is an overview of what FNC offers, and what it can potentially mean for your application.
TMS FNC Controls can be simultaneously used on these frameworks:
TMS FNC Controls can be simultaneously used on these operating systems/browsers:


TMS FNC Controls can be simultaneously used on these IDE's:
One Codebase
With FNC, we aim for one code base, that can be re-used on all the supported frameworks and eventually target multiple operating systems. We started with FMX and VCL, and thanks to the high level of abstraction we added LCL support which gave us access to Unix operating systems. Recently, we have added WEB support as well via TMS WEB Core. As an example, we have created an FNC overview demo to demonstrate the "one-codebase - multiple targets" principle.
We are currently also working very hard on a BETA of FNC, which brings a lot of small improvements and fixes, but also brings 2 new components: TTMSFNCPDFLib and TTMSFNCGraphicsPDFIO. In case you missed the blog post demonstrating these 2 components, check out the blog post at the following URL: https://www.tmssoftware.com/site/blog.asp?post=560. The blog post focusses on creating a report in PDF completely generated client-side in the webbrowser. It shows how to mix custom PDF content and existing FNC components and of course also works on the "one codebase - multiple targets" principle explained in this blog post.
We want your feedback!
Please feel free to leave a comment, send us an email with suggestions on this approach and what we can improve in our communication. We want you to get a smile out of your application, because a smiling application, is a smiling customer!↧
FNC BETA with 2 new components
BETA
A new FNC BETA is release is available for all active and registered customers! It includes 2 new components and a lot of smaller improvements and fixes.- TTMSFNCPDFLib: Non-visual component for creating rich content PDF documents.
- HTML formatted text support
- Drawing primitives such as lines, rectangles, ellipses and custom paths
- Support for horizontal and vertical linear gradients
- Separate Fill and Stroke implementation
- URL support
- Unicode character support
- Cross platform
- Support for images drawing with optional stretching, aspect ratio
- Text flow in multiple columns
- Overflow detection and calculation
- Numerous predefined page sizes
- Optional page header and footer
- TTMSFNCGraphicsPDFIO: Non-visual component based on TTMSFNCPDFLib to export UI controls such as TTMSFNCGrid, TTMSFNCPlanner, TTMSFNCChart as well as the complete dashboard controls set and many more.
There is a accompanying guide (PDF) that can help get your application set up with these 2 new components.

Where do I find the BETA?
The BETA for all FNC products (TMS FNC Core, TMS FNC Chart, TMS FNC Blox, TMS FNC Dashboard Pack, TMS FNC UI Pack, TMS FNC Cloud Pack) can be found under the "My Products" page for all active and registered users. Each product will have a separate BETA download link available. Make sure to uninstall all FNC related products and install the TMS FNC Core BETA first.↧
FNC Code Gems: Display information and common folders

The FNC framework helps you to develop framework-independent, cross-platform applications. It has been conceived by tmssoftware.com a couple of years ago and has recently added the web as one of its platforms fascilitating TMS Web Core.
FNC really helps you to use the same source code for Windows, MacOS, iOS, Android, Linux and Raspberry Pi. Further, you can use the same components in the frameworks that give you access to these platforms: VCL, FMX and LCL.
A lot of functionality is exposed using non-visual components as well. However, I recently found a true gem of a class in its TMSFNCUtils.pas unit. The unit, of course, is available as VCL.TMSFNCUtils.pas, FMX.TMSFNCUtils.pas, and LCL.TMSFNCUtils.pas which means it can be used in any framework.
The unit contains one significant class called TTMSFNCUtils that offers a plethora of functionality that is usually tedious to implement and repetitive.
Today, we will focus on two different aspects in this blog post, and I will post more functionality in the coming weeks.
Display attributes
As blogged a couple of days ago, getting information about your display is very important so that you can scale your images correctly.TTMSFNCUtils gives you two very useful methods to get the relevant information about your forms and components quickly. Knowing what DPI your display uses is only half the work as you also need to know what DPI a certain component was designed for:
type
 TTMSFNCUtils = class
  public
    class function IsHighDPIScale: Boolean;
    class function GetDPIScale({%H-}AOwner: TComponent = nil): Single;
 end;
Be aware, that all methods are class-methods, i.e. you can determine if the current form uses a High DPI scale using:
LIsHighDPI := TTMSFNCUtils.IsHighDPIScale;
GetDPIScale allows you to specify a component or a form. If you specify nil the DPI scale of the form will be returned.
Getting common folders
Any application I have built so far needed to know the users documents directory and the application directory. The utility class provides cross-platform helper methods for both:
type
 TTMSFNCUtils = class
  public

    class function GetDocumentsPath: String;
    class function GetAppPath: String;
 end;
Getting the users document directory and the application directory now becomes two lines of code for all supported platforms:
LMyDocPath := TTMSFNCUtils.GetDocumentsPath;
 LAppPath   := TTMSFNCUtils.GetAppPath;
Providing flexible classes as TTMSFNCUtils, the framework truly takes away the chores of multi-framework-multi-platform development.
↧
↧
Using Bootstrap themes and runtime theme selection in TMS WEB Core applications

Without a doubt, Bootstrap is one of the most popular CSS libraries for web applications. Using Bootstrap, you can easily create a consistent and modern looking web application. Since its inception, TMS WEB Core is designed to be totally open with respect to using a CSS library like Bootstrap or any other CSS library.
Basically, using HTML templates for your form files, you have the full HTML/CSS power to your disposition but also when building forms via the Delphi form designer there is help to use and integrate CSS.
Every TMS WEB Core UI control has at least the ElementClassName property from where you can set CSS classname(s) for the main HTML elements in the control. Where multiple HTML elements are used in UI controls, often multiple Element*ClassName properties exist. The Eleent*ClassName property editor in the IDE is smart, as it provides automatically lookup of possible CSS class names. This lookup is based on CSS libraries you might have added manually or via a library to your application.

But, back to Bootstrap! Given this is such a popular & powerful library, we've gone an extra step from TMS WEB Core v1.2.4.0 facilitating the ease of use to use it from the IDE and also to allow runtime Bootstrap theme selection.. To get started with Bootstrap in your project, select from the project context menu in the Project Manager under "Managing JavaScript Libraries" jQuery 3.3.1 (since Bootstrap 4 uses jQuery) and Bootstrap 4.3.1.

Now, at form level you have a new property TWebForm.CSSLibrary = (cssNone, cssBootstrap). Default this is cssNone but when you set it to cssBootstrap, this is picked up by UI control when these are added to the form so these new UI controls get optimally preset for Bootstrap.
To illustrate this, when we add a new checkbox to a form with CSSLibrary = cssNone, this becomes:

Now, when we set the form.CSSLibrary to cssBootstrap and add a checkbox, you can notice that a number of the TWebCheckBox properties got preset for optimal rendering with Bootstrap.
WebCheckBox.ElementButtonClassName = 'custom-control-input'
WebCheckBox.ElementClassName = 'custom-control custom-checkbox'
WebCheckBox.ElementFont = efCSS
WebCheckBox.ElementLabelClassName = 'custom-control-label'
When rendered, the result is:

Of course, we can further fine-tune CSS classnames after adding UI controls on the form and the form will not override any custom settings you might have done.
For example, below you can see a TWebPanel with a default style, a Bootstrap style and customized Bootstrap style:
The panel Bootstrap style is:
WebPanel.ElementBodyClassName = 'card-body'
WebPanel.ElementClassName = 'card'
But, if we further customize the WebPanel.ElementClassName and make it a Bootstrap style 'card shadow p-3 mb-5 bg-white rounded' it will render as:

Dialogs will also automatically pickup the Bootstrap style when used on a form with CSSLibrary = cssBootstrap. Standard, the call:
begin
  MessageDlg('Do you like the new Bootstrap capabilities?',mtInformation, [mbYes, mbNo]);
end;
results in:
When Bootstrap is used, it automatically becomes:

Bootstrap themes
Now, we have used the standard Bootstrap CSS style and while some like it because it is so recognizable and consistent, other people prefer to create something that stands out. There are various possibilities. Given the standarization the Bootstrap CSS class names, it is easy to use libraries that build on Bootstrap like mdbootstrap for example. When we add the mdbootstrap cdn reference <link href="https://cdnjs.cloudflare.com/ajax/libs/mdbootstrap/4.8.5/css/mdb.min.css" rel="stylesheet"> to a TMS WEB Core project, it becomes:

And there is more, on the internet you will find lots of Bootstrap themes, many of which are free and open source. A nice collection can be found at: https://bootstrap.themes.guide/
We have added a new demo that shows how you can use such themes and even how you can change the theme of your TMS WEB Core web application at runtime easily.
Basically, to use a Bootstrap theme from https://bootstrap.themes.guide/ , we need to add a theme.css after including the Bootstrap CSS library. To switch such theme at runtime, we can use the TApplication methods ChangeCSS(), InsertCSS(), RemoveCSS().
So, from the demo we have included several such theme.css files to the project

To perform the theme selection at runtime, we have added a TWebListControl that lists the available themes and from the list OnClick event, switching the theme is as easy as:
procedure TForm3.WebListControl1ItemClick(Sender: TObject;
  AListItem: TListItem);
begin
  WebListcontrol1.ItemIndex := AListItem.Index;

  if WebListcontrol1.ItemIndex = 0 then
    Application.RemoveCSS('themecss')
  else
    Application.InsertCSS('themecss',AListItem.Text+'/theme.css');
end;
In the other panel, you can see a radiogroup and a way to show messageboxes, so you can see the effect of the selected theme also on these controls and dialogs.


Something else noteworthy in the demo is the easy of use to create a responsive design. This is achieved with the TWebResponsiveGridPanel. This grid panel is used to show the two panels under each other on small devices like smartphones or portrait tables and next to each other on desktop browsers or landscape tablets.
The use of TWebResponsiveGridPanel to create such responsive design is really easy. When we double-click it, we can see the two possible layouts. When the device screen width is smaller than 700, the style is "1fr", meaning one full width column is used and for the screen width larger than 700, style is "1fr 1fr", meaning the screen width is divided in two equally wide full column widths.

The TWebResponsiveGridPanel.WidthStyle is configured here as ssPercent and TWebResponsiveGridPanel.WidthPercent is 100%, so the TWebResponsiveGridPanel always takes the full screen width. The TWebResponsiveGridPanel.HeightStyle is set to ssAuto. This means that the height of the panel automatically adapts to the content of the panel. This means the height will be the height of the panel child controls when two columns are used and twice the height of the child panels when the panels are rendered under each other on smartphone screens.
Well, what is easier than let you see and play with the demo live from your favorite browser?
Go here for the themes demo!
Excited to go ahead and discover these and more fascinating features in TMS WEB Core that let you create web client applications with unprecedented capabilities?
You can download the trial version, go ahead with the standalone version you purchased or with TMS WEB Core and additional tools that are all included in TMS ALL-ACCESS. Our team looks forward to all your comments, feedback, feature-requests to help steering the development of TMS WEB Core to the next stages!
↧
TMS FNC Core 1.4 update with 2 new components
Intro
We are happy to announce TMS FNC Core 1.4 is available for all active and registered customers! It includes 2 new components and a lot of smaller improvements and fixes.- TTMSFNCPDFLib: Non-visual component for creating rich content PDF documents.
- HTML formatted text support
- Drawing primitives such as lines, rectangles, ellipses and custom paths
- Support for horizontal and vertical linear gradients
- Separate Fill and Stroke implementation
- URL support
- Unicode character support
- Cross platform
- Support for images drawing with optional stretching, aspect ratio
- Text flow in multiple columns
- Overflow detection and calculation
- Numerous predefined page sizes
- Optional page header and footer
- TTMSFNCGraphicsPDFIO: Non-visual component based on TTMSFNCPDFLib to export UI controls such as TTMSFNCGrid, TTMSFNCPlanner, TTMSFNCChart as well as the complete dashboard controls set and many more.
There is a accompanying guide (PDF) that can help get your application set up with these 2 new components.
Separate Product
We are also excited to announce that TMS FNC Core will be available as a separate product. As already mentioned in the intro, TMS FNC Core has received a major update with 2 new components, but has already been the heart and soul for all FNC products for a long time. It includes a lot more "hidden" functionality that can be used separately from any other FNC product. Below is a list of some of the most important features.- JSON reading, writing and parsing functionality
- Base64 and URL encoding and decoding
- Component persistence
- Undo/Redo Manager
- Verification of numeric, alphanumeric character sets
- Message, file open and save dialogs
- Easy access to application and documents folder
- Open files and URLs
- Bitmap container for storing JPEG, PNG, ICO, GIF and many more image formats with optional automatic URL downloading mechanism
Coming Up!
Making TMS FNC Core available as a separate product doesn't change anything for your current subscription, we only want to make this available as we are planning partnership opportunities, with you as a customer, in the future. Developing your own controls, libraries based on TMS FNC Core will allow you to write the code once and target multiple frameworks/operating systems. Stay tuned for more news coming up in the near future!↧
FNC Code Gems: Helpers for Base64 encoding and decoding
In the last post, I looked at methods to help you get information about connected displays and determine the path name for common folders. Lets look at something very valuable when you want to convert binary data into a string: Base64 encoding.This is somewhat tricky if you have to consider all the different platforms and frameworks. FNC makes it very easy!
Again, the class TTMSFNCUtils offers awesome methods to get results quickly:
class function FileToBase64(const AFile: TTMSFNCUtilsFile): string;

class function Decode64(const AValue: string;
                        const AURL: Boolean = False): string;
class function Encode64(const AValue: string;
                        const AURL: Boolean = False): string; overload;
class function Encode64(const AValue: TBytes;
                        const AURL: Boolean = False): string; overload;
Not only are there methods to encode and decode strings, there is also FileToBase64 which allows you to retrieve the Base64 string for a file using a single line of code:
LBase64String := TTMSFNCUtils.FileToBase64( 'mydata.bin' );
Ignore the data type of AFile to specify the filename. In VCL and FMX the type TTMSFNCUtilsFile it is mapped to a string. However, for web applications you cannot specify a local file name and the method has to be invoked differently. There is no inverse function for this as it is already a one-liner in Delphi now to store a string or a byte array into a file using TFile from System.IOUtils.
In order to encode a string, call Encode64; call Decode64 to decode a string:
LMyBase64String := TTMSFNCUtils.Encode64( 'testtest', false );
LMyTestString   := TTMSFNCUtils.Decode64( LMyBase64String, false );
Remember, these methods are available for VCL, FMX, LCL, and TMS Web Core.
↧