Quantcast
Channel: TMS Software
Viewing all 1006 articles
Browse latest View live

VCL Grid goodies

$
0
0

TMS Software Delphi  Components

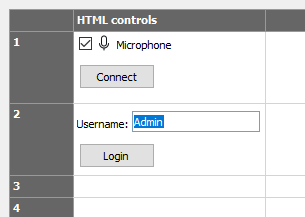
A little known and little used but at the same time very powerful feature is the use of HTML controls in TAdvStringGrid cells. HTML controls are the concept of specifying controls for cells via HTML tags in the HTML assigned to a grid cell. It is the grid HTML  engine that is then responsible for rendering the controls and for handling the interacting with these controls.

Among the supported controls are : checkbox, radiobutton, button, edit, combobox.

While the grid alternatively has functions to add a checkbox, button, radiobutton to a cell via grid.AddCheckBox(), grid.AddButton(), grid.AddRadioButton(), using HTML controls means you can add as many of these controls you want, in the order you want and mixed with text and images. 

Performance and resources

You might wonder why introducing this concept when you could add a TPanel instance to a cell with grid.CellControls[Col,Row] and add any control you want to the panel to have these in a grid cell. While this is a perfectly possible approach, this quickly turns into a very bad idea when you would want to fill hundreds or thousands of cells in the grid. Note that for a grid of only 100x100 columns/rows, there are already 10.000 cells. When you would add for each cell a TPanel with on the TPanel a TCheckBox, TEdit and TButton, this means you would ask Windows to allocate 4 window handles for each of these controls per cell. For a 100x100 grid, this is creating 40.000 window handles. This is absolutely not a good idea to waste precious Windows resources & performance for!

Resource friendly HTML controls

When adding HTML controls to a cell, this HTML control only exists in the cell string value and is rendered when the cell needs to be rendered only. It is rendering using drawing, no real Windows controls are involved. In a 100x100 columns/rows grid, it is only the visible cells that well be rendered, so typically far less than 10.000 cells. Also when the user interacts with a checkbox, radiobutton or regular HTML control button, there is never a real Windows control involved. All is rendered by the grid. It is only when the user starts editing in a HTML edit or combobox control that just during editing time, a real Windows control is involved. That means, the grid  will internally create a TEdit or TComboBox control, position it in the cell, allow the editing and will remove the control again after editing.

You can see that with this architecture, whether you add 10.000, 50.000 or even more HTML controls does not really matter for performance or resource usage. Maximum one control at a time will be live and used.

Using HTML controls

Using HTML controls is simple. These are represented in the cell HTML as tags of the type <CONTROL> and this tag had the attributes:

  • TYPE: sets the type of the control. This can be EDIT, CHECK, RADIO, BUTTON, COMBO
  • WIDTH: sets the width in pixels for the control
  • VALUE: sets the value of the control 
  • ID: a unique control identifier that can be used to programmatically get & set its value

To get or set a control value, the grid has the property

grid.ControlValues[Col,Row: integer; ID: string): string;

When the user interacts with any of the HTML controls in the cell, the grid can notify with the following events:

grid.OnControlClick       : event triggered when a control is clicked, returns the ID of the control

grid.OnControlComboList   : event triggered to query values for a HTML control combobox when it is about to be edited

grid.OnControlComboSelect : event triggered when the user has selected a value in a HTML combobox control

grid.OnControlEditDone    : event triggered when the editing in a HTML edit control stopped by user leaving focus


Putting it together

Here is a code snippet that initializes a default grid with 2 cells that feature HTML controls:

procedure TForm1.FormCreate(Sender: TObject);
var
  UserName: array[0..128] of char;
  szUserName: cardinal;
begin
  szUserName := 128;
  GetUserName(UserName, szUserName);

  AdvStringGrid1.ColWidths[1] := 192;
  AdvStringGrid1.RowHeights[1] := 72;
  AdvStringGrid1.RowHeights[2] := 72;

  // if we want the HTML controls in the cell to be enabled for editing, editing needs to be enabled at grid level
  AdvStringGrid1.Options := AdvStringGrid1.Options + [goEditing];

  // adds a checkbox and button HTML control to cell 1,1
  AdvStringGrid1.Cells[1,1] := '<CONTROL TYPE="CHECK" WIDTH="24" ID="CHK"> <IMG SRC="IDX:0"> Microphone <BR><BR><CONTROL TYPE="BUTTON" WIDTH="80" ID="BTN1" VALUE="Connect">';

  // adds an edit control and button HTML control to cell 1,2
  AdvStringGrid1.Cells[1,2] := 'Username: <CONTROL TYPE="EDIT" WIDTH="128" ID="USER"> <BR><CONTROL TYPE="BUTTON" WIDTH="80" ID="BTN2" VALUE="Login">';

  // initializes the value of the HTML edit control in cell 1,2 to the Windows username
  AdvStringGrid1.ControlValues[1,2,'USER'] := UserName;
end;

Now, we can react to events triggered from the HTML cell controls by implementing the grid.OnControlClick event and check for the unique ID of the HTML control that triggered the event:

procedure TForm1.AdvStringGrid1ControlClick(Sender: TObject; ARow,
  ACol: Integer; CtrlID, CtrlType, CtrlVal: string);
var
  v: string;
begin
  // check of button in cell 1,1 was clicked
  if CtrlID = 'BTN1' then
  begin
    // get value of the HTML check control in cell 1,1. 
    // HTML check value returns TRUE when checked or empty when not checked
    v := AdvStringGrid1.ControlValues[1,1,'CHK'];
    if v = 'TRUE' then
      ShowMessage('Connect with microphone')
    else
      ShowMessage('Connect without microphone');
  end;

  // check of button in cell 1,2 was clicked
  if CtrlID = 'BTN2' then
  begin
    // get value of the HTML edit control in cell 1,2 
    v := AdvStringGrid1.ControlValues[1,2,'USER'];
    ShowMessage('Login for '+ v);
  end;
end;

The result when running a VCL application with TAdvStringGrid and the cell controls is:

TMS Software Delphi  Components

Summary

TAdvStringGrid is all about flexibility and packed with features. HTML controls in cells can be that specific feature you are looking for to give your users a performance & resource friendly but better experience dealing with interaction in cells.
Note that besides HTML controls, the mini-HTML rendering engine in TAdvStringGrid can do much more other things to nicely format and visually fine-tune appearance of data in cells. For details about the capabilities of this small but fast mini-HTML rendering engine, check this resource. Note that these mini-HTML capabilities are also available in many more mini-HTML enabled VCL controls in the TMS VCL UI Pack.

More #GRIDGOODIES ?

Today's #GRIDGOODIES article was requested by a user of the TMS VCL UI Pack's TAdvStringGrid. If you also have suggestions or ideas to cover a maybe lesser known feature in the grid, let us know in the comments or by email!


Real-world Delphi projects out of this world...

$
0
0

How much of our daily life here on planet Earth is impacted by running Delphi code is beyond imagination. Whether it is controlling trains on the French railway system, contact tracing in the COVID19 pandemic in Poland, salary calculation and reporting in Germany, tax invoice approvals in Brazil,... the list is endless. But Delphi's impact already reached out beyond planet Earth with several projects of the NASA and this week we stumbled on the social media post from Dave Akerman mentioning it was Delphi based software where several TMS components were involved, that was used to produce the sophisticated coating for the Perseverance parachute that was instrumental in its highly critical but eventually successful and safe landing on Mars on Feb 18:

TMS Software Delphi  Components
As we chatted, I found out that David had a similar educational background as me in electronic engineering, also loves car racing, worked together with a very good friend of mine having a company Theys Industrial producing electronic PCB's 2km away from here and I learned that the fabrics for the Perseverance parachute were produced by the company Picanol that is like 20km driving from where the TMS headquarters are. Talking about coincidences...
Well, that was enough a reason to get in touch with David and have a chat about our passion we all share: software development with Delphi! Our colleague Holger Flick produced this video interview with David, where David tells exciting stories of how he got into software development, how he used Delphi for controlling machines precisely mixing chemicals, how he also uses Delphi for his hobby of tracking weather measurement balloons (where TMS WEB Core plays a role in), how he uses the FireMonkey framework for writing software for a Sony watch and so much more...

I'm sure you will enjoy this video interview between two passionate Delphi software developers and be inspired to also do cool things with Delphi!


TMS FNC Maps 1.3 released!

$
0
0

What's new?

The first TMS FNC Maps update of 2021 includes 2 often requested features: programmatically toggle StreetView mode in TTMSFNCGoogleMaps and the ability to avoid toll roads with TTMSFNCDirections.


Toggle StreetView mode in TTMSFNCGoogleMaps

TMS Software Delphi  Components


With just one line of code it is now possible to switch to StreetView mode on the map's current center position. This feature is available exclusively for the TTMSFNCGoolgeMaps component.

  TMSFNCGoogleMaps1.Options.StreetView.Enabled := not TMSFNCGoogleMaps1.Options.StreetView.Enabled;


Avoid toll roads with TTMSFNCDirections

TMS Software Delphi  Components


Adjust your routing with just a single parameter to avoid toll roads. This feature is available for the following directions services: Google, Here, Bing, Azure and MapBox.

Avoid toll roads:

    TMSFNCDirections1.GetDirections(StartCoordinate, EndCoordinate, nil, '', nil, False, tmDriving, nil, False, '', mlmDefault, True);

Include toll roads (default):

    TMSFNCDirections1.GetDirections(StartCoordinate, EndCoordinate, nil, '', nil, False, tmDriving, nil, False, '', mlmDefault, False);


What's next?

Although we are already working on a future update, it's a little early to reveal what we have planned for now.
I hope you enjoy the new features and I'm looking forward to share more exciting new additions to TMS FNC Maps throughout the new year! 


SVG quality improvements

$
0
0

Intro

A while back, we introduced SVG in TMS VCL UI Pack. The first version focused on smaller icon sets. We have meanwhile tweaked and improved the engine and although there is still a lot of work to be done, the next update of TMS VCL UI Pack will offer 2 quality of life improvements:

  • Gradients (GDI+)
  • Rendering quality (GDI+)
  • Disabled drawing (TVirtualImageList)

Gradients

Gradients were left out of the first version because of shortcomings on other platforms, as we also have SVG rendering engine support for FNC targeting not only VCL, but also FMX, LCL and WEB. The underlying native graphics can be quite complex and have various differences between frameworks. Therefore we decided to take the initial step of offering linear & radial gradients support in VCL only using GDI+. Please note that we are still targeting smaller less complex icons, but we'll add improvements over time.

TMS Software Delphi  Components


Rendering quality

The initial version did not use the full quality that GDI+ had to offer. When working with SVG, we focused on adding features instead of quality and therefore the rendering quality was not optimal. We have now changed this so it has a smoother appearance independant of the size.

v1.0                       v1.1

TMS Software Delphi  Components       TMS Software Delphi  Components


Disabled drawing

In v1.0 we also added support for TVirtualImageList, which converts SVG files into bitmaps on the correct size without losing quality. You can add a TAdvSVGImageCollection attached to a TVirtualImageList and specify only one SVG suitable for any size you want. The TVirtualImageList also has the ability of automatically adding disabled state versions of the converted bitmaps. Initially, this was not working due to the way the bitmap alpha channel was configured and the SVG quality drawing on the bitmap before returning it to the TVirtualImageList. In this update, we have added correct alpha channel to the bitmap conversion routine.

TMS Software Delphi  Components TMS Software Delphi  Components


What's next?

The above applies to VCL only and will be part of the next update of TMS VCL UI Pack. The engine is a port from FNC, support for other operating systems (macOS, iOS, Android) is still ongoing. As soon as things get shape, we'll post an update.


Freebie Friday: Windows version info

$
0
0

TMS Software Delphi  Components

Coincidence or not, but 26 years ago, in 1995, not only Delphi 1 was released by Borland but Microsoft also released Windows 95 that from that moment on skyrocketed in popularity and went for world domination as operating system.
Who would have thought in 1995 that 26 years later, detecting on what Windows operating system your software is running would be more complex than ever?
Over the years, Microsoft released not only new major versions almost every 2 to 3 years but also all sorts of editions like the Windows NT operating system for example. 
In 2015 Microsoft released Windows 10 and decided it would continue to release incremental updates all under the Windows 10 moniker but also here Microsoft went on to make it available in different editions (Education, Home, Pro, Enterprise) and at the same time continued to release major updates to its server operating system Windows 2016 Server and Windows 2019 Server.

Needless to say that proper Windows operating system version detection became non-trivial over the years. Added to this complexity is the fact that Microsoft decided to create a mechanism to return Windows version information to applications through its APIs different from the real Windows version and this depending on the application manifest. The reason for this approach was obviously for ensuring old applications would continue to work thinking they were running on older Windows operating systems, but it doesn't make things easier. 

So, forget about all this history, forget about all this complexity as after all, it is Friday today and we are heading to the weekend to celebrate the 26th anniversary of Delphi. This #FreebieFriday brings you one routine GetOperatingSystem() that returns the Windows version and also the version number as string:

procedure GetOperatingSystem(var AName: string; var AVersion: string);
const
  SM_SERVERR2 = 89;
  VER_NT_WORKSTATION = $0000001;

type
  pfnRtlGetVersion = function(var RTL_OSVERSIONINFOEXW): DWORD; stdcall;

var
  osVerInfo: TOSVersionInfoEx;
  majorVer, minorVer, spmajorVer, spminorVer, buildVer, edition: Cardinal;
  ver: RTL_OSVERSIONINFOEXW;
  RtlGetVersion: pfnRtlGetVersion;

  procedure GetUnmanistedVersion(var majv,minv,buildv: cardinal);
  begin
    @RtlGetVersion := GetProcAddress(GetModuleHandle('ntdll.dll'), 'RtlGetVersion');
    if Assigned(RtlGetVersion) then
    begin
      ZeroMemory(@ver, SizeOf(ver));
      ver.dwOSVersionInfoSize := SizeOf(ver);

      if RtlGetVersion(ver) = 0 then
      begin
        majv := ver.dwMajorVersion;
        minv := ver.dwMinorVersion;
        buildv := ver.dwBuildNumber;
      end;
    end;
  end;

  function GetWindows10Edition: string;
  begin
    Result := 'Windows 10';
    GetProductInfo(majorVer, minorVer, spmajorVer, spminorVer, edition);

    case edition and $FF of
    $62..$65: Result := 'Windows 10 Home';
    $79..$7A: Result := 'Windows 10 Education';
    $46,$04,$48,$1B,$54,$7D,$7E,$81,$82: Result := 'Windows 10 Enterprise';
    $30,$31,$A1,$A2: Result := 'Windows 10 Pro';
    end;
  end;

begin
  AName := 'Unknown';
  AVersion := '0';
  // set operating system type flag
  osVerInfo.dwOSVersionInfoSize := SizeOf(TOSVersionInfoEx);
  if GetVersionEx(POSVersionInfo(@osVerInfo)^) then
  begin
    majorVer := osVerInfo.dwMajorVersion;
    minorVer := osVerInfo.dwMinorVersion;
    buildVer := osVerInfo.dwBuildNumber;

    AVersion := majorVer.ToString + '.' + minorVer.ToString + '.' + buildVer.ToString;

    case osVerInfo.dwPlatformId of
      VER_PLATFORM_WIN32_NT: // Windows NT/2000
        begin
          if majorVer <= 4 then
            AName := 'Windows NT'
          else if (majorVer = 5) and (minorVer = 0) then
            AName := 'Windows 2000'
          else if (majorVer = 5) and (minorVer = 1) then
            AName := 'Windows XP'
          else if (majorVer = 5) and (minorVer = 2) then
            AName := 'Windows 2003'
          else if (majorVer = 6) and (minorVer = 0) then
          begin
            AName := 'Windows Vista';

            if osVerInfo.wProductType = VER_NT_WORKSTATION then
              AName := 'Windows Vista'
            else
              AName := 'Windows Server 2008';
          end
          else if (majorVer = 6) and (minorVer = 1) then
          begin
            if osVerInfo.wProductType = VER_NT_WORKSTATION then
               AName := 'Windows 7'
            else
               AName := 'Windows Server 2008R2';
          end
          else if (majorVer = 6) and (minorVer = 2) then
          begin
            GetUnmanistedVersion(majorVer, minorVer, buildVer);

            AVersion := majorVer.ToString + '.' + minorVer.ToString + '.' + buildVer.ToString;

            if (majorVer = 6) and (minorVer = 2) then
            begin
              if osVerInfo.wProductType = VER_NT_WORKSTATION then
                AName := 'Windows 8'
              else
                AName := 'Windows Server 2012'
            end;

            if (majorVer = 6) and (minorVer = 3) then
            begin
              if osVerInfo.wProductType = VER_NT_WORKSTATION then
                AName := 'Windows 8.1'
              else
                AName := 'Windows Server 2012R2'
            end;

            if (majorVer = 10) and (minorVer = 0) then
            begin
              if osVerInfo.wProductType = VER_NT_WORKSTATION then
                AName := 'Windows 10'
              else
              begin
                if osVerInfo.dwBuildNumber >= 17763 then
                  AName := 'Windows Server 2019'
                else
                  AName := 'Windows Server 2016';
              end;
            end;

          end
          else if (majorVer = 6) and (minorVer = 3) then
          begin
            if osVerInfo.wProductType = VER_NT_WORKSTATION then
              AName := 'Windows 8.1'
            else
              AName := 'Windows Server 2012R2'
          end
          else if (majorVer = 6) and (minorVer = 4) then
          begin
            if osVerInfo.wProductType = VER_NT_WORKSTATION then
            begin
              AName := GetWindows10Edition;
            end
            else
            begin
              if osVerInfo.dwBuildNumber >= 17763 then
                AName := 'Windows Server 2019'
              else
                AName := 'Windows Server 2016'
            end;
          end
          else if (majorVer = 10) and (minorVer = 0) then
          begin
            if osVerInfo.wProductType = VER_NT_WORKSTATION then
              AName := GetWindows10Edition
            else
            begin
              if osVerInfo.dwBuildNumber >= 17763 then
                AName := 'Windows Server 2019'
              else
                AName := 'Windows Server 2016'
            end;
          end
          else
            AName := 'Unknown';
        end;
      VER_PLATFORM_WIN32_WINDOWS:  // Windows 9x/ME
        begin
          if (majorVer = 4) and (minorVer = 0) then
            AName := 'Windows 95'
          else if (majorVer = 4) and (minorVer = 10) then
          begin
            if osVerInfo.szCSDVersion[1] = 'A' then
              AName := 'Windows 98 SE'
            else
              AName := 'Windows 98';
          end
          else if (majorVer = 4) and (minorVer = 90) then
            AName := 'Windows ME'
          else
            AName := 'Unknown';
        end;
      else
        AName := 'Unknown';
    end;
  end;
end;

Copy & paste this code and you can use it as:

var
  AName, AVersion: string;
begin
  GetOperatingSystem(AName, AVersion);
  memo.Lines.Text := ANAme +' ' + AVersion;
end;


Here, on this machine, it returns:
Windows 10 Pro 10.0.19041

For what is it worth, this method is also used in the TMS VCL UI Pack component TEXEInfo and can be used by calling the class function:

EXEInfo.GetOperatingSystem: string;


TEXEInfo can in addition to this information extract detailed application version information from the running application or another application with EXEInfo.GetVersionInfoOfApp(EXEName);

Enjoy this #FreebieFriday and don't hesitate to let us know what other interesting Freebies you wish to see or share an interesting routine you created yourself with fellow Delphi developers!


Planning / Scheduling in FMX

$
0
0

Intro

TMS Software Delphi  Components
The multi-device, true native app platform The FireMonkey® framework is the app development and runtime platform behind RAD Studio, Delphi and C++Builder. FireMonkey is designed for teams building multi-device, true native apps for Windows, OS X, Android and iOS, and getting them to app stores and enterprises fast.
source: https://www.embarcadero.com/products/rad-studio/fm-application-platform

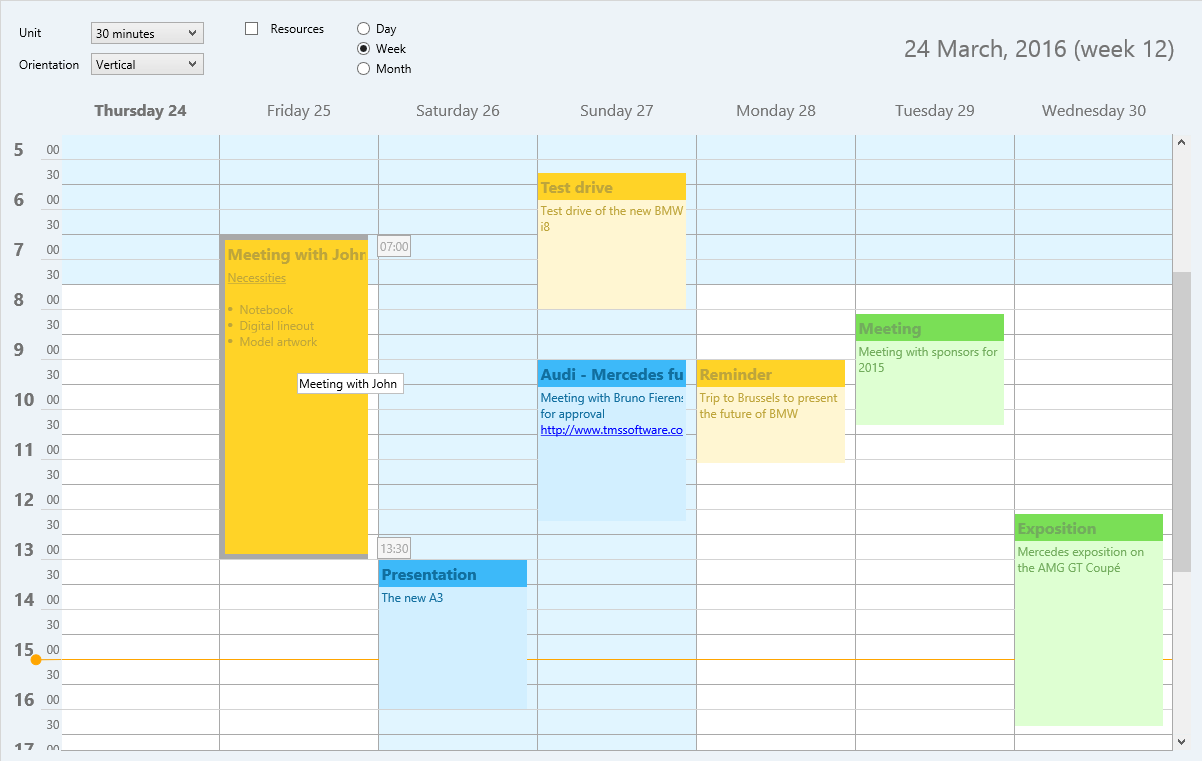
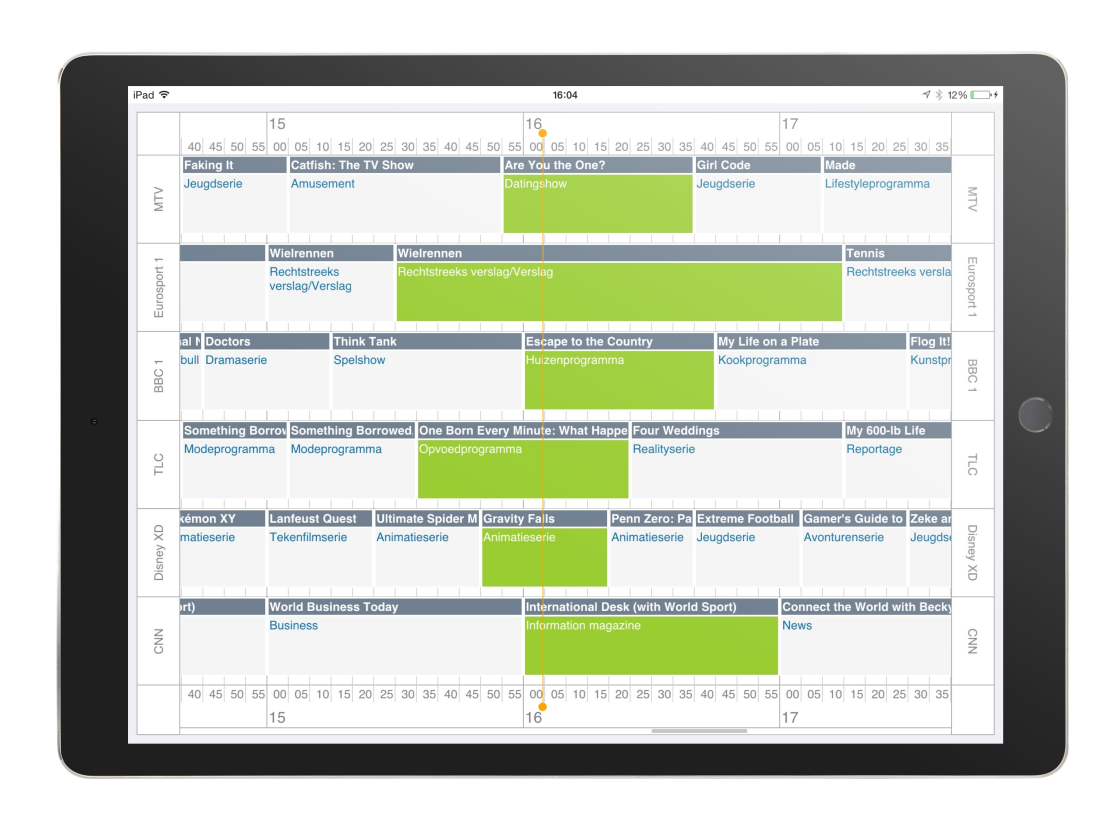
FMX (FireMonkey) released in 2011 and shortly after we delivered a first set of components. Today, we want to show you the TTMSFNCPlanner component, a highly configurable planning/scheduling component.

TMS Software Delphi  Components

Features

Below is a list of the most important features the TTMSNCPlanner has to offer. The features are not limited to this list, but this will give you a quick insight on what we offer to be able to view and edit appointments / tasks in FireMonkey.

  • Built-in and customizable inplace and dialog editing
  • Moveable and sizeable items with HTML formatted text and hyperlink detection
  • High performance virtual mode
  • Various display modes: day, month, day period, half day period, multi day, multi month, multi day resource, multi resource day and custom displays
  • Multiple events for all kinds of interactions such as editing, item inserting, updating, moving and sizing
  • Multiple events for custom drawing and customization of default drawing
  • Item hints and time indication helpers
  • Optional overlapping items
  • Touch scrolling and selection
  • Optimized for mobile devices
  • Recurrency support
  • Databinding support via the TTMSFNCPlannerDatabaseAdapter
  • Separate ToolBar Popup
  • PDF Export capabilities

TMS Software Delphi  Components


Learn More!

Want to learn more about what the TTMSFNCPlanner can do? Here is a video that highlights some of the above features through a demo application.


Download & Explore!

The TTMSFNCPlanner component is part of the TMS FNC UI Pack, which, on top of FMX, also offers the ability to write your code once and target other frameworks (VCL, LCL and WEB). You can download a full featured trial version of the TMS FNC UI Pack and start exploring the capabilities of the TTMSFNCPlanner component.

Coming up

The TTMSFNCPlanner is the second of a series of components that is covered to empower your FMX (FireMonkey) developments. We started the series with a general overview of the most important components that we have to offer, followed by the TTMSFNCRichEditor. Next up will be the TTMSFNCTreeView component, a highly configurable, high performance tree view with virtual and collection-based modes able to deal with millions of nodes so stay tuned for more!.


Taking the wraps of TMS Web Academy!

$
0
0

TMS Software Delphi  Components

We are thrilled to launch the first version of our new platform TMS Web Academy almost on the same day as the 26th anniversary of Delphi. We have been working about 5 months on this new TMS Web Academy platform and now it is ready to take the wraps of it. We invite you to have a look but more precisely to join our welcome webinar we organize today as well as the first 'real' webinar planned for Friday 19th about "The making of the TMS Web Academy" platform. See this on our calendar of the events and the possibility to register to participate. 

How it all started

It will come as no surprise that the covid19 pandemic was instrumental to get the plans rolling to create our TMS Web Academy. Whereas in normal years, TMS software not only participates and gives sessions at numerous Delphi related events across Europe (Foren Tage, SDN conference, Barnsten Delphi seminars in Benelux and France, EKON conference, PasCon, ITDevCon,  ...) and our colleague Wagner Landgraf in Brazil but also organized meetups in our office and our annual 2-day Training Days event in Germany, in 2020 there was literally not a single live event that took place. 

We received numerous emails from users asking when we would organize something or when we would offer a possibility to come and sit together with our experts to learn about the latest features and techniques we offer in our various products. At the same time, we really missed the interaction with you, the chats between the sessions, your questions and suggestions. 

As such, the idea was born to organize webinars, training, communication via an online platform.

Why create our own platform?

I can imagine the first question will be why to create our own platform for bringing online webinars and training. There are so many ways to collaborate online already, so why reinvent the wheel? Well, there are several reasons. Let me give you a few in no particular order:

  • Eat your own dogfood and show the power of TMS WEB Core
  • Have exactly the kind of interaction wanted for organizing webinars and online training
  • Use a web platform so it can be accessed everywhere and on every device
  • Be totally configurable and extensible to the direction we want to go with it
  • Tight integration with our website and user database
  • Full control over look & feel and branding
  • Offer a platform that is usable by everyone working distributed over the world for TMS

Goals

First of all, we absolutely do not see the TMS Web Academy as a replacement for live events. I can actually not wait before going again to a live event somewhere in Europe, to have people in meetups at the company or to organize our training days again. At the same time, we do not consider TMS Web Academy as a temporary solution for reaching out to you while the covid19 pandemic lasts. No, the TMS Web Academy will serve as our platform to organize online interactive webinars and training in a much more dynamic way than a physical event can be organized and serve a world-wide audience. Whereas organizing Training Days at a location takes multiple months of preparation, comes with a cost, requires attendees to travel and to allocate these specific days of the training, we will be able to organize webinars & training on a much shorter notice and we can, when desirable, automatically record for replay at a time convenient for you. We initially aim for at least 2 webinars per months and as we get fluent with the platform ourselves, introduce also more in-depth & highly interactive paid training sessions given by product experts. Even when (hopefully) normal life returns after the covid19 pandemic, this makes very much sense to keep offering on a continuous basis.

What can you do?

Very simple: let us know what content is of interest to you! We want to tune the content in the free webinars and paid training as much as possible to your needs. We are eager to learn about what topics you want more coverage, what subject you wish to see covered in-depth and learn from it. This will be our main guideline for creating the content in the coming months & years.

Visit our calendar of events and register! We look forward to see you there and talk to you in our TMS Web Academy!


GraphQL, workflow engine, multitenancy and more: what you will do with Delphi in 2021

$
0
0

Here at TMS, we are working on so much new exciting frameworks and features that I decided to share with you what we expect to bring to you in 2021!

Photo by Rhett Wesley on Unsplash


Photo by Rhett Wesley on Unsplash

First, a disclaimer: this is not an official commitment. Some of the things listed here might be delayed or not be released at all. But of course, that's not our intention, since we are listing it here. We want to (and probably will) release all of this in 2021. But, since unexpected things might happen, we can never guarantee what will happen in future. One second thing: thislist only covers what is coming around TMS Business line of products. There is much more to come from TMS in 2021!

I was going to title this post as "TMS Business Roadmap for 2021". But I thought that the current title brings more attention and curiosity. And it looks like it worked, thanks for coming! ??

Ok, jokes aside, another reason is that we still don't know if all of the libraries, features and technologies listed here will be part of the TMS Business bundle, and the original title could be misleading.

But regardless, everything listed here will for sure be smoothly integrated with TMS Business - either using ORM (TMS Aurelius) or REST/JSON framework (TMS XData), or any other core product, what is for sure is that everything listed here makes up a huge ecosystem around TMS Business technologies.

An exciting year is coming ahead! So, without further ado, this is what we expect to bring to Delphi world this year, with TMS Business.


GraphQL

TMS is bringing GraphQL to Delphi! We have it already in a beta state, the core is complete, all is going fine. We still need to document everything, and add a few more features here and there, but it's in a very advanced stage.

This teaser video shows GraphQL server in action, written in Delphi! The frontend is GraphQL Playground JS framework, but still being served via a Delphi server.

Delphi GraphQL Hello World


The relevant parts of the code used to build the server in the video are the following. First, the GraphQL schema is built:

SchemaDocument := TGraphQLDocumentParser.ParseSchema(
    'type Query { hello(name: String!): String }');
  Schema := TGraphQLSchemaBuilder.Build(SchemaDocument);

  Schema.SetResolver('Query', 'hello', function(Args: TFieldResolverArgs): TValue
    begin
      Result := 'Hello, ' + Args.GetArgument('name').AsString;
    end
  );


Then, the endpoints for the GraphQL API and the GraphQL Playground are created:

  ADispatcher.AddModule(
    TGraphQLServerModule.Create('http://+:2001/tms/graphql', FSchema));

  ADispatcher.AddModule(
    TGraphQLPlaygroundModule.Create('http://+:2001/tms/playground', '/tms/graphql'));


And that's it for the "Hello, world" demo!


TMS Auth

A complete framework for adding authentication to your application, with user, roles and permissions management and providing features like login, registration, e-mail confirmation and more.

Relying on Aurelius ORM and XData REST framework, with a few lines of code you will get all your database setup and have an authentication API server running, with lots of features.

Well, it's said one picture is worth a thousand words, so here is an example of the available API out of box:

Auth Swagger Auth Swagger 2


And these are screenshots of an existing app built with TMS Web Core which is already using TMS Auth for user registration and login:

Auth User Registration


It will never been as easy to add user and permissions management and login system to your Delphi application and server!


BPM Workflow

A full workflow engine is coming. You might ask what is the difference between this new library and TMS Workflow Studio.

It's a night and day difference. TMS Workflow Studio is nice product, but it was made 13 years ago with a different goal in mind - desktop VCL applications - and when lots of technologies didn't even exist, and even several TMS products. Cross-platform, REST servers, ORM, cloud applications.

This new project is a workflow engine written from scratch, with all modern technologies and paradigms in mind. It will have a REST API, it will be cross-database, thread-safe, scalable, and of course will have lots of new features.

The following workflow, for example:

Renewal Process Workflow


Can be built from code this way:

RenewalProcess := TProcessBuilder.CreateProcess
    .Variable('process_id')
    .StartEvent
    .Condition(GroupedCondition([
      TRenewalAllowedCondition.Create,
      SubscriptionNotInAnyProcess
    ]))
    .Activity(SetProcessStatus(TProcessStatus.processing))
    .Activity(IssueInvoice)
    .ExclusiveGateway.Id('gateway1')
      .Condition(THasErrorCondition.Create)
      .Activity(TRenewalFailureActivity.Create).Id('renewal_failure')
      .Activity(SetProcessStatus(TProcessStatus.failed))
      .EndEvent
    .GotoElement('gateway1')
      .Condition(InvoiceIsPaid)
      .Activity(RenewSubscription).Id('renew_subscription')
      .ExclusiveGateway.Id('gateway4')
        .Condition(THasErrorCondition.Create)
        .LinkTo('renewal_failure')
      .GotoElement('gateway4')
        .Activity(TRenewalSuccessActivity).Id('renewal_success')
        .Activity(SetProcessStatus(TProcessStatus.succeeded))
        .EndEvent
    .GotoElement('gateway1')
      .Condition(InvoiceIsOpen)
      .Activity(ChargePayment).Id('charge_payment')
      .Activity(GetPaymentStatus).Id('get_payment_status')
      .ExclusiveGateway.Id('gateway2')
        .Condition(THasErrorCondition.Create)
        .LinkTo('renewal_failure')
      .GotoElement('gateway2')
        .Condition(GroupedCondition(
          TConditionOperator._or, [PaymentIsCanceled, PaymentIsFailed]))
        .LinkTo('renewal_failure')
      .GotoElement('gateway2')
        .Condition(PaymentIsSucceeded)
        .ExclusiveGateway.Id('gateway3')
          .Condition(InvoiceIsPaid)
          .LinkTo('renew_subscription')
        .GotoElement('gateway3')
          .Condition(InvoiceIsOpen)
          .LinkTo('charge_payment')
    .Done;
end;


And can be executed in a thread queue, can be instantiated using a REST API, and many more to come. Actually, you can follow what is being developed so far in its GitHub repository. We are still working on it of course, in both features and licensing terms.


REST Server Authorization

TMS XData, our amazing library for building REST APIs and multitier applications, will have an authorization mechanism that will be very easy to use.

Developers will be able to just add authorization attributes to methods (service operations) or entities (automatic CRUD endpoints) and everything will be applied accordingly. Fine-tuning the protection of your REST API will never be as simple.

  [Authorize]
  IDocumentService = interface(IInvokable)
    procedure Insert(Value: TDoc);

    [AuthorizeScopes('user, editor')]
    procedure Modify(Value: TDoc);

    [AuthorizeScopes('admin')]
    procedure Delete(DocId: string);

    [AuthorizeClaims('email')]
    procedure Approve(DocId: string);
  end;


In the example above, all methods (endpoints) require authentication, because the interface has an Authorize attribute that propagates to all methods. So, to invoke Insert, user must be authenticated. Still, to invoke Modify, the user must be authenticated and have either user or editor scope in its credentials. He must be admin to invoke Delete, and finally to approve a document, user must have an email in its claims.

It's also worth noting that the same strategy applies to entities that generate automatic CRUD endpoints:

  [Entity, Automapping]
  [EntityAuthorize]
  [EntityAuthorizeScopes('editor', [TEntitySetPermission.Modify, TEntitySetPermission.Insert])]
  [EntityAuthorizeScopes('admin', [TEntitySetPermission.Delete])]
  TCustomer = class
  {...}
  public
    property Id: Integer read FId write FId;
    property Name: string read FName write FName;
  end;


To access customer endpoints, user must be authenticated. But he must have editor privileges to modify and insert (PUT and POST) and must be admin to invoke DELETE. Easy and straightforward.


Development for the web: even easier

TMS XData is smoothly integrated with TMS Web Core, the TMS framework to build web applications. It provides easy-to-use, high-level client classes to access XData servers from Web Core applications. With the amazing release of TMS Web Core 1.6, several language features were introduced, like generics, async/await, attributes, among others.

This will make TMS XData client objects easier than ever to be used in web applications. The experience will be pretty similar to VCL/FMX applications, like retrieving entity objects from the server without having to deal with JSON directly and invoking endpoints using interfaces without having to worry about HTTP methods or URL endpoints.

And even more, async/await can be used. As an example, invoking a XData REST API endpoint asynchronously will be as easy as doing this:

PendingOrders := await(XClient.List<TOrder>('$filter=Status eq pending'));
if PendingOrders.Count = 0 then
  Exit; // no pending orders to process


The single line above will build the HTTP request with proper URL endpoint and HTTP method, invoke it, deserialize the returned JSON into a list of TOrder objects, and all asynchronously! The await function will guarantee that the next line will be executed only after the async execution is executed. Can't get easier than that.


Global filters and multitenancy

Our state-of-art ORM for Delphi, TMS Aurelius, will have amazing additions this year. One of them is the global filter mechanism. Users will be able to define filters globally, including parameters, and choose which entities will have it applied.

While global filters can obviously be used for any purpose, using it to build multitenant applications is the first one that comes to mind. Consider the following entity class mapped with filtering attributes:

  [Entity, Automapping]
  [Filter('Multitenant')]
  [FilterDef('Multitenant', '{TenantId} = :tenantId')]
  [FilterDefParam('Multitenant', 'tenantId', TypeInfo(string))]
  TProduct = class
  private
    FId: Integer;
    FName: string;
    FTenantId: string;
  public
    property Id: Integer read FId write FId;
    property Name: string read FName write FName;
    property TenantId: string read FTenantId write FTenantId;
  end;


You can use the class normally, without any filter. But you can also enable the "Multitenant" filter like this:

  Manager.EnableFilter('Multitenant')
    .SetParam('tenantId', 'acme');
  Products := Manager.Find<TProduct>.OrderBy('Name').List;


After you've enabled the "Multitenant" filter passing the proper id, you can use the Aurelius object manager as usual. But any request you do, like in the example, asking a list of products, will add the tenant filter.

Aurelius will not only allow global filters for queries, but also will allow you to enforce the filter in INSERT, UPDATE and DELETE operations:

  FEnforcer := TFilterEnforcer.Create('Multitenant', 'TenantId', 'FTenantId');
  FEnforcer.AutoComplyOnInsert := True;
  FEnforcer.AutoComplyOnUpdate := True;
  FEnforcer.Activate(TMappingExplorer.Get('Samples'));


Thus, you can simply create or modify a product as you would usually do in single tenant application, but the filter enforcer will make sure to set data to the proper tenant id (or raise an error if the tenant is wrong, depending on your configuration).

Building single-database multitenant applications with TMS Aurelius is already possible, of course. But it will be really easy with the upcoming features. And not only that: building multi-database multitenant applications will also be easy with the new TMultiTenantConnectionPool:

  FMultiPool := TMultiTenantConnectionPool.Create(
    TXDataHttpHeaderTenantResolver.Create('tenant-id'),
    TDBConnectionPoolFactory.Create
    );


The pool will automatically choose the correct database based on the HTTP header tenant-id - or any other criteria you might choose. All transparently.

In summary: you will be able to build your app as if you are coding for single tenant applications, and let Aurelius do everything under the hood to make it multitenant, with minimum effort and in a robust and reliable way.


Data validation

Another great feature coming is data validation. Again, you can already do it using events, but soon it will be orders of magnitude easier. You will be able to add validators to your entities in several ways, attributes being the most common (irrelevant parts of the following class declaration removed for clarity):

  TCustomer = class
  private
    [Required]
    FName: string;
    
    [EmailAddress]
    FEmail: string;
  
    [DisplayName('class rate')]
    [Range(1, 10, 'Values must be %1:d up to %2:d for field %0:s')]
    FInternal_Rate: Integer;


All fields will be proper validated according to the validation attributes applied. Name will be required, Email must be a valid address and FInternal_Rate value must be between 1 and 10. With a few lines you will guarantee that the entity will be persisted with a valid state.

Validation will also help you with your API and GUI. Note how you can provide readable display names and error messages. When using validation in your API build with XData, the API responses will be detailed and informative, and all automatically:

Validation JSON response


And, of course, you can benefit from such information to easily build nice user interfaces informing the user about the validation results. The following screenshot is the same one used for the TMS Auth example above, but displaying results for password validation:

Password validation results


Attribute-based event handlers

Events are an important feature of any framework, and with Aurelius is not different. It provides several events you can use to add custom business logic. You can add specific code just before an entity is being saved, after an entity is deleted, when an SQL is being executed, among others.

The interesting feature coming is that you will now be able to add event handlers directly in your classes, using attributes. This will make your code even more organized, will improve readability and allow you to better follow the single-responsibility principle. It will be as simple as this:

TCustomer = class
  [OnInserting]
  procedure DoSomethingBeforeSave;

  [OnDelete]
  procedure DoSomethingAfterDelete;


Whenever a customer entity is about to be persisted, OnInserting method will be called and you can add any relevant code in that method. You can receive arguments in OnInserting, or you can even use with without them, like in the example above, making you class really independent of 3rd party custom types.

And more events are coming as well, for example, the new data validation mechanism mentioned above will also offer you an OnValidate event, which you can easily use like this:

TCustomer = 
  [OnValidate]
  function CheckBirthday: IValidationResult;

{...}  

  function TCustomer.CheckBirthday: IValidationResult;
  begin
    Result := TValidationResult.Create;

    if YearOf(Birthday) < 1899 then
      Result.Errors.Add(TValidationError
        .Create('A person born in the XIX century is not accepted'));

    if (MonthOf(Birthday) = 8) and (DayOf(Birthday) = 13) then
      Result.Errors.Add(TValidationError
        .Create('A person born on August, 13th is not accepted'));
  end;


That's all...?

I hope you have followed me until here, and I hope you are as excited as us with the upcoming features and and libraries. Yes, that's a lot of things to expect for Delphi and TMS Business in 2021! But I'd like to stress that what's coming is not necessarily limited to what we put here. There might be even more! (Things we cannot disclose right now).

Did you like the news? Please comment below, let us know what you think and what are your opinions and expectations on this. And don't forget to subscribe to our news channels to be informed when things are released and for many other exciting news from TMS: subscribe to our e-mail newsletter, follow our Facebook page and subscribe to our YouTube channel!

Update: Want to see these listed features in action? Register for the free webinar "What is coming in TMS BIZ in 2021", to happen on Tuesday, February 23, 2021 3:00:00 PM UTC at the TMS Web Academy!



Free webinar: What is coming in TMS BIZ in 2021

VCL Grid goodies

$
0
0

TMS Software Delphi  Components

A little known and little used but at the same time very powerful feature is the use of HTML controls in TAdvStringGrid cells. HTML controls are the concept of specifying controls for cells via HTML tags in the HTML assigned to a grid cell. It is the grid HTML  engine that is then responsible for rendering the controls and for handling the interacting with these controls.

Among the supported controls are : checkbox, radiobutton, button, edit, combobox.

While the grid alternatively has functions to add a checkbox, button, radiobutton to a cell via grid.AddCheckBox(), grid.AddButton(), grid.AddRadioButton(), using HTML controls means you can add as many of these controls you want, in the order you want and mixed with text and images. 

Performance and resources

You might wonder why introducing this concept when you could add a TPanel instance to a cell with grid.CellControls[Col,Row] and add any control you want to the panel to have these in a grid cell. While this is a perfectly possible approach, this quickly turns into a very bad idea when you would want to fill hundreds or thousands of cells in the grid. Note that for a grid of only 100x100 columns/rows, there are already 10.000 cells. When you would add for each cell a TPanel with on the TPanel a TCheckBox, TEdit and TButton, this means you would ask Windows to allocate 4 window handles for each of these controls per cell. For a 100x100 grid, this is creating 40.000 window handles. This is absolutely not a good idea to waste precious Windows resources & performance for!

Resource friendly HTML controls

When adding HTML controls to a cell, this HTML control only exists in the cell string value and is rendered when the cell needs to be rendered only. It is rendering using drawing, no real Windows controls are involved. In a 100x100 columns/rows grid, it is only the visible cells that well be rendered, so typically far less than 10.000 cells. Also when the user interacts with a checkbox, radiobutton or regular HTML control button, there is never a real Windows control involved. All is rendered by the grid. It is only when the user starts editing in a HTML edit or combobox control that just during editing time, a real Windows control is involved. That means, the grid  will internally create a TEdit or TComboBox control, position it in the cell, allow the editing and will remove the control again after editing.

You can see that with this architecture, whether you add 10.000, 50.000 or even more HTML controls does not really matter for performance or resource usage. Maximum one control at a time will be live and used.

Using HTML controls

Using HTML controls is simple. These are represented in the cell HTML as tags of the type <CONTROL> and this tag had the attributes:

  • TYPE: sets the type of the control. This can be EDIT, CHECK, RADIO, BUTTON, COMBO
  • WIDTH: sets the width in pixels for the control
  • VALUE: sets the value of the control 
  • ID: a unique control identifier that can be used to programmatically get & set its value

To get or set a control value, the grid has the property

grid.ControlValues[Col,Row: integer; ID: string): string;

When the user interacts with any of the HTML controls in the cell, the grid can notify with the following events:

grid.OnControlClick       : event triggered when a control is clicked, returns the ID of the control

grid.OnControlComboList   : event triggered to query values for a HTML control combobox when it is about to be edited

grid.OnControlComboSelect : event triggered when the user has selected a value in a HTML combobox control

grid.OnControlEditDone    : event triggered when the editing in a HTML edit control stopped by user leaving focus


Putting it together

Here is a code snippet that initializes a default grid with 2 cells that feature HTML controls:

procedure TForm1.FormCreate(Sender: TObject);
var
  UserName: array[0..128] of char;
  szUserName: cardinal;
begin
  szUserName := 128;
  GetUserName(UserName, szUserName);

  AdvStringGrid1.ColWidths[1] := 192;
  AdvStringGrid1.RowHeights[1] := 72;
  AdvStringGrid1.RowHeights[2] := 72;

  // if we want the HTML controls in the cell to be enabled for editing, editing needs to be enabled at grid level
  AdvStringGrid1.Options := AdvStringGrid1.Options + [goEditing];

  // adds a checkbox and button HTML control to cell 1,1
  AdvStringGrid1.Cells[1,1] := '<CONTROL TYPE="CHECK" WIDTH="24" ID="CHK"> <IMG SRC="IDX:0"> Microphone <BR><BR><CONTROL TYPE="BUTTON" WIDTH="80" ID="BTN1" VALUE="Connect">';

  // adds an edit control and button HTML control to cell 1,2
  AdvStringGrid1.Cells[1,2] := 'Username: <CONTROL TYPE="EDIT" WIDTH="128" ID="USER"> <BR><CONTROL TYPE="BUTTON" WIDTH="80" ID="BTN2" VALUE="Login">';

  // initializes the value of the HTML edit control in cell 1,2 to the Windows username
  AdvStringGrid1.ControlValues[1,2,'USER'] := UserName;
end;

Now, we can react to events triggered from the HTML cell controls by implementing the grid.OnControlClick event and check for the unique ID of the HTML control that triggered the event:

procedure TForm1.AdvStringGrid1ControlClick(Sender: TObject; ARow,
  ACol: Integer; CtrlID, CtrlType, CtrlVal: string);
var
  v: string;
begin
  // check of button in cell 1,1 was clicked
  if CtrlID = 'BTN1' then
  begin
    // get value of the HTML check control in cell 1,1. 
    // HTML check value returns TRUE when checked or empty when not checked
    v := AdvStringGrid1.ControlValues[1,1,'CHK'];
    if v = 'TRUE' then
      ShowMessage('Connect with microphone')
    else
      ShowMessage('Connect without microphone');
  end;

  // check of button in cell 1,2 was clicked
  if CtrlID = 'BTN2' then
  begin
    // get value of the HTML edit control in cell 1,2 
    v := AdvStringGrid1.ControlValues[1,2,'USER'];
    ShowMessage('Login for '+ v);
  end;
end;

The result when running a VCL application with TAdvStringGrid and the cell controls is:

TMS Software Delphi  Components

Summary

TAdvStringGrid is all about flexibility and packed with features. HTML controls in cells can be that specific feature you are looking for to give your users a performance & resource friendly but better experience dealing with interaction in cells.
Note that besides HTML controls, the mini-HTML rendering engine in TAdvStringGrid can do much more other things to nicely format and visually fine-tune appearance of data in cells. For details about the capabilities of this small but fast mini-HTML rendering engine, check this resource. Note that these mini-HTML capabilities are also available in many more mini-HTML enabled VCL controls in the TMS VCL UI Pack.

More #GRIDGOODIES ?

Today's #GRIDGOODIES article was requested by a user of the TMS VCL UI Pack's TAdvStringGrid. If you also have suggestions or ideas to cover a maybe lesser known feature in the grid, let us know in the comments or by email!


Real-world Delphi projects out of this world...

$
0
0

How much of our daily life here on planet Earth is impacted by running Delphi code is beyond imagination. Whether it is controlling trains on the French railway system, contact tracing in the COVID19 pandemic in Poland, salary calculation and reporting in Germany, tax invoice approvals in Brazil,... the list is endless. But Delphi's impact already reached out beyond planet Earth with several projects of the NASA and this week we stumbled on the social media post from Dave Akerman mentioning it was Delphi based software where several TMS components were involved, that was used to produce the sophisticated coating for the Perseverance parachute that was instrumental in its highly critical but eventually successful and safe landing on Mars on Feb 18:

TMS Software Delphi  Components
As we chatted, I found out that David had a similar educational background as me in electronic engineering, also loves car racing, worked together with a very good friend of mine having a company Theys Industrial producing electronic PCB's 2km away from here and I learned that the fabrics for the Perseverance parachute were produced by the company Picanol that is like 20km driving from where the TMS headquarters are. Talking about coincidences...
Well, that was enough a reason to get in touch with David and have a chat about our passion we all share: software development with Delphi! Our colleague Holger Flick produced this video interview with David, where David tells exciting stories of how he got into software development, how he used Delphi for controlling machines precisely mixing chemicals, how he also uses Delphi for his hobby of tracking weather measurement balloons (where TMS WEB Core plays a role in), how he uses the FireMonkey framework for writing software for a Sony watch and so much more...

I'm sure you will enjoy this video interview between two passionate Delphi software developers and be inspired to also do cool things with Delphi!


Compiling 1 million+ lines of code with Rad Studio 10.4.2

$
0
0

One of the things that intrigued me about the new Rad Studio 10.4.2 release was the improved compiler performance. Because Delphi is a fast compiler --we all know that-- but hey, it can always be faster. And 10 seconds in every compile end up counting for a lot of time over the days.

So I tried it compiling FlexCel and its test suite. Over a million lines of code, and actual code. This isn't a synthetic benchmark with a single unit and a million lines of "WriteLn('Hello world');". We have lots of generics, a little more than 3000 units, multiple includes, cycles of units that use themselves recursively, and complex dependencies.  It turns out that spreadsheets require a lot of code.

Below you can find a small video, with Rad Studio 10.4.2 on your left and 10.3 on your right. I normally wait a while before adopting a new Delphi version, but given all the time I spend compiling FlexCel, I migrated to 10.4.2 yesterday. This is the type of improvements I want from Embarcadero, and I hope they deliver more.


SVG quality improvements

$
0
0

Intro

A while back, we introduced SVG in TMS VCL UI Pack. The first version focused on smaller icon sets. We have meanwhile tweaked and improved the engine and although there is still a lot of work to be done, the next update of TMS VCL UI Pack will offer 2 quality of life improvements:

  • Gradients (GDI+)
  • Rendering quality (GDI+)
  • Disabled drawing (TVirtualImageList)

Gradients

Gradients were left out of the first version because of shortcomings on other platforms, as we also have SVG rendering engine support for FNC targeting not only VCL, but also FMX, LCL and WEB. The underlying native graphics can be quite complex and have various differences between frameworks. Therefore we decided to take the initial step of offering linear & radial gradients support in VCL only using GDI+. Please note that we are still targeting smaller less complex icons, but we'll add improvements over time.

TMS Software Delphi  Components


Rendering quality

The initial version did not use the full quality that GDI+ had to offer. When working with SVG, we focused on adding features instead of quality and therefore the rendering quality was not optimal. We have now changed this so it has a smoother appearance independant of the size.

v1.0                       v1.1

TMS Software Delphi  Components       TMS Software Delphi  Components


Disabled drawing

In v1.0 we also added support for TVirtualImageList, which converts SVG files into bitmaps on the correct size without losing quality. You can add a TAdvSVGImageCollection attached to a TVirtualImageList and specify only one SVG suitable for any size you want. The TVirtualImageList also has the ability of automatically adding disabled state versions of the converted bitmaps. Initially, this was not working due to the way the bitmap alpha channel was configured and the SVG quality drawing on the bitmap before returning it to the TVirtualImageList. In this update, we have added correct alpha channel to the bitmap conversion routine.

TMS Software Delphi  Components TMS Software Delphi  Components


What's next?

The above applies to VCL only and will be part of the next update of TMS VCL UI Pack. The engine is a port from FNC, support for other operating systems (macOS, iOS, Android) is still ongoing. As soon as things get shape, we'll post an update.


Freebie Friday: Windows version info

$
0
0

TMS Software Delphi  Components

Coincidence or not, but 26 years ago, in 1995, not only Delphi 1 was released by Borland but Microsoft also released Windows 95 that from that moment on skyrocketed in popularity and went for world domination as operating system.
Who would have thought in 1995 that 26 years later, detecting on what Windows operating system your software is running would be more complex than ever?
Over the years, Microsoft released not only new major versions almost every 2 to 3 years but also all sorts of editions like the Windows NT operating system for example. 
In 2015 Microsoft released Windows 10 and decided it would continue to release incremental updates all under the Windows 10 moniker but also here Microsoft went on to make it available in different editions (Education, Home, Pro, Enterprise) and at the same time continued to release major updates to its server operating system Windows 2016 Server and Windows 2019 Server.

Needless to say that proper Windows operating system version detection became non-trivial over the years. Added to this complexity is the fact that Microsoft decided to create a mechanism to return Windows version information to applications through its APIs different from the real Windows version and this depending on the application manifest. The reason for this approach was obviously for ensuring old applications would continue to work thinking they were running on older Windows operating systems, but it doesn't make things easier. 

So, forget about all this history, forget about all this complexity as after all, it is Friday today and we are heading to the weekend to celebrate the 26th anniversary of Delphi. This #FreebieFriday brings you one routine GetOperatingSystem() that returns the Windows version and also the version number as string:

procedure GetOperatingSystem(var AName: string; var AVersion: string);
const
  SM_SERVERR2 = 89;
  VER_NT_WORKSTATION = $0000001;

type
  pfnRtlGetVersion = function(var RTL_OSVERSIONINFOEXW): DWORD; stdcall;

var
  osVerInfo: TOSVersionInfoEx;
  majorVer, minorVer, spmajorVer, spminorVer, buildVer, edition: Cardinal;
  ver: RTL_OSVERSIONINFOEXW;
  RtlGetVersion: pfnRtlGetVersion;

  procedure GetUnmanistedVersion(var majv,minv,buildv: cardinal);
  begin
    @RtlGetVersion := GetProcAddress(GetModuleHandle('ntdll.dll'), 'RtlGetVersion');
    if Assigned(RtlGetVersion) then
    begin
      ZeroMemory(@ver, SizeOf(ver));
      ver.dwOSVersionInfoSize := SizeOf(ver);

      if RtlGetVersion(ver) = 0 then
      begin
        majv := ver.dwMajorVersion;
        minv := ver.dwMinorVersion;
        buildv := ver.dwBuildNumber;
      end;
    end;
  end;

  function GetWindows10Edition: string;
  begin
    Result := 'Windows 10';
    GetProductInfo(majorVer, minorVer, spmajorVer, spminorVer, edition);

    case edition and $FF of
    $62..$65: Result := 'Windows 10 Home';
    $79..$7A: Result := 'Windows 10 Education';
    $46,$04,$48,$1B,$54,$7D,$7E,$81,$82: Result := 'Windows 10 Enterprise';
    $30,$31,$A1,$A2: Result := 'Windows 10 Pro';
    end;
  end;

begin
  AName := 'Unknown';
  AVersion := '0';
  // set operating system type flag
  osVerInfo.dwOSVersionInfoSize := SizeOf(TOSVersionInfoEx);
  if GetVersionEx(POSVersionInfo(@osVerInfo)^) then
  begin
    majorVer := osVerInfo.dwMajorVersion;
    minorVer := osVerInfo.dwMinorVersion;
    buildVer := osVerInfo.dwBuildNumber;

    AVersion := majorVer.ToString + '.' + minorVer.ToString + '.' + buildVer.ToString;

    case osVerInfo.dwPlatformId of
      VER_PLATFORM_WIN32_NT: // Windows NT/2000
        begin
          if majorVer <= 4 then
            AName := 'Windows NT'
          else if (majorVer = 5) and (minorVer = 0) then
            AName := 'Windows 2000'
          else if (majorVer = 5) and (minorVer = 1) then
            AName := 'Windows XP'
          else if (majorVer = 5) and (minorVer = 2) then
            AName := 'Windows 2003'
          else if (majorVer = 6) and (minorVer = 0) then
          begin
            AName := 'Windows Vista';

            if osVerInfo.wProductType = VER_NT_WORKSTATION then
              AName := 'Windows Vista'
            else
              AName := 'Windows Server 2008';
          end
          else if (majorVer = 6) and (minorVer = 1) then
          begin
            if osVerInfo.wProductType = VER_NT_WORKSTATION then
               AName := 'Windows 7'
            else
               AName := 'Windows Server 2008R2';
          end
          else if (majorVer = 6) and (minorVer = 2) then
          begin
            GetUnmanistedVersion(majorVer, minorVer, buildVer);

            AVersion := majorVer.ToString + '.' + minorVer.ToString + '.' + buildVer.ToString;

            if (majorVer = 6) and (minorVer = 2) then
            begin
              if osVerInfo.wProductType = VER_NT_WORKSTATION then
                AName := 'Windows 8'
              else
                AName := 'Windows Server 2012'
            end;

            if (majorVer = 6) and (minorVer = 3) then
            begin
              if osVerInfo.wProductType = VER_NT_WORKSTATION then
                AName := 'Windows 8.1'
              else
                AName := 'Windows Server 2012R2'
            end;

            if (majorVer = 10) and (minorVer = 0) then
            begin
              if osVerInfo.wProductType = VER_NT_WORKSTATION then
                AName := 'Windows 10'
              else
              begin
                if osVerInfo.dwBuildNumber >= 17763 then
                  AName := 'Windows Server 2019'
                else
                  AName := 'Windows Server 2016';
              end;
            end;

          end
          else if (majorVer = 6) and (minorVer = 3) then
          begin
            if osVerInfo.wProductType = VER_NT_WORKSTATION then
              AName := 'Windows 8.1'
            else
              AName := 'Windows Server 2012R2'
          end
          else if (majorVer = 6) and (minorVer = 4) then
          begin
            if osVerInfo.wProductType = VER_NT_WORKSTATION then
            begin
              AName := GetWindows10Edition;
            end
            else
            begin
              if osVerInfo.dwBuildNumber >= 17763 then
                AName := 'Windows Server 2019'
              else
                AName := 'Windows Server 2016'
            end;
          end
          else if (majorVer = 10) and (minorVer = 0) then
          begin
            if osVerInfo.wProductType = VER_NT_WORKSTATION then
              AName := GetWindows10Edition
            else
            begin
              if osVerInfo.dwBuildNumber >= 17763 then
                AName := 'Windows Server 2019'
              else
                AName := 'Windows Server 2016'
            end;
          end
          else
            AName := 'Unknown';
        end;
      VER_PLATFORM_WIN32_WINDOWS:  // Windows 9x/ME
        begin
          if (majorVer = 4) and (minorVer = 0) then
            AName := 'Windows 95'
          else if (majorVer = 4) and (minorVer = 10) then
          begin
            if osVerInfo.szCSDVersion[1] = 'A' then
              AName := 'Windows 98 SE'
            else
              AName := 'Windows 98';
          end
          else if (majorVer = 4) and (minorVer = 90) then
            AName := 'Windows ME'
          else
            AName := 'Unknown';
        end;
      else
        AName := 'Unknown';
    end;
  end;
end;

Copy & paste this code and you can use it as:

var
  AName, AVersion: string;
begin
  GetOperatingSystem(AName, AVersion);
  memo.Lines.Text := ANAme +' ' + AVersion;
end;


Here, on this machine, it returns:
Windows 10 Pro 10.0.19041

For what is it worth, this method is also used in the TMS VCL UI Pack component TEXEInfo and can be used by calling the class function:

EXEInfo.GetOperatingSystem: string;


TEXEInfo can in addition to this information extract detailed application version information from the running application or another application with EXEInfo.GetVersionInfoOfApp(EXEName);

Enjoy this #FreebieFriday and don't hesitate to let us know what other interesting Freebies you wish to see or share an interesting routine you created yourself with fellow Delphi developers!


Planning / Scheduling in FMX

$
0
0

Intro

TMS Software Delphi  Components
The multi-device, true native app platform The FireMonkey® framework is the app development and runtime platform behind RAD Studio, Delphi and C++Builder. FireMonkey is designed for teams building multi-device, true native apps for Windows, OS X, Android and iOS, and getting them to app stores and enterprises fast.
source: https://www.embarcadero.com/products/rad-studio/fm-application-platform

FMX (FireMonkey) released in 2011 and shortly after we delivered a first set of components. Today, we want to show you the TTMSFNCPlanner component, a highly configurable planning/scheduling component.

TMS Software Delphi  Components

Features

Below is a list of the most important features the TTMSNCPlanner has to offer. The features are not limited to this list, but this will give you a quick insight on what we offer to be able to view and edit appointments / tasks in FireMonkey.

  • Built-in and customizable inplace and dialog editing
  • Moveable and sizeable items with HTML formatted text and hyperlink detection
  • High performance virtual mode
  • Various display modes: day, month, day period, half day period, multi day, multi month, multi day resource, multi resource day and custom displays
  • Multiple events for all kinds of interactions such as editing, item inserting, updating, moving and sizing
  • Multiple events for custom drawing and customization of default drawing
  • Item hints and time indication helpers
  • Optional overlapping items
  • Touch scrolling and selection
  • Optimized for mobile devices
  • Recurrency support
  • Databinding support via the TTMSFNCPlannerDatabaseAdapter
  • Separate ToolBar Popup
  • PDF Export capabilities

TMS Software Delphi  Components


Learn More!

Want to learn more about what the TTMSFNCPlanner can do? Here is a video that highlights some of the above features through a demo application.


Download & Explore!

The TTMSFNCPlanner component is part of the TMS FNC UI Pack, which, on top of FMX, also offers the ability to write your code once and target other frameworks (VCL, LCL and WEB). You can download a full featured trial version of the TMS FNC UI Pack and start exploring the capabilities of the TTMSFNCPlanner component.

Coming up

The TTMSFNCPlanner is the second of a series of components that is covered to empower your FMX (FireMonkey) developments. We started the series with a general overview of the most important components that we have to offer, followed by the TTMSFNCRichEditor. Next up will be the TTMSFNCTreeView component, a highly configurable, high performance tree view with virtual and collection-based modes able to deal with millions of nodes so stay tuned for more!.


Taking the wraps of TMS Web Academy!

$
0
0

TMS Software Delphi  Components

We are thrilled to launch the first version of our new platform TMS Web Academy almost on the same day as the 26th anniversary of Delphi. We have been working about 5 months on this new TMS Web Academy platform and now it is ready to take the wraps of it. We invite you to have a look but more precisely to join our welcome webinar we organize today as well as the first 'real' webinar planned for Friday 19th about "The making of the TMS Web Academy" platform. See this on our calendar of the events and the possibility to register to participate. 

How it all started

It will come as no surprise that the covid19 pandemic was instrumental to get the plans rolling to create our TMS Web Academy. Whereas in normal years, TMS software not only participates and gives sessions at numerous Delphi related events across Europe (Foren Tage, SDN conference, Barnsten Delphi seminars in Benelux and France, EKON conference, PasCon, ITDevCon,  ...) and our colleague Wagner Landgraf in Brazil but also organized meetups in our office and our annual 2-day Training Days event in Germany, in 2020 there was literally not a single live event that took place. 

We received numerous emails from users asking when we would organize something or when we would offer a possibility to come and sit together with our experts to learn about the latest features and techniques we offer in our various products. At the same time, we really missed the interaction with you, the chats between the sessions, your questions and suggestions. 

As such, the idea was born to organize webinars, training, communication via an online platform.

Why create our own platform?

I can imagine the first question will be why to create our own platform for bringing online webinars and training. There are so many ways to collaborate online already, so why reinvent the wheel? Well, there are several reasons. Let me give you a few in no particular order:

  • Eat your own dogfood and show the power of TMS WEB Core
  • Have exactly the kind of interaction wanted for organizing webinars and online training
  • Use a web platform so it can be accessed everywhere and on every device
  • Be totally configurable and extensible to the direction we want to go with it
  • Tight integration with our website and user database
  • Full control over look & feel and branding
  • Offer a platform that is usable by everyone working distributed over the world for TMS

Goals

First of all, we absolutely do not see the TMS Web Academy as a replacement for live events. I can actually not wait before going again to a live event somewhere in Europe, to have people in meetups at the company or to organize our training days again. At the same time, we do not consider TMS Web Academy as a temporary solution for reaching out to you while the covid19 pandemic lasts. No, the TMS Web Academy will serve as our platform to organize online interactive webinars and training in a much more dynamic way than a physical event can be organized and serve a world-wide audience. Whereas organizing Training Days at a location takes multiple months of preparation, comes with a cost, requires attendees to travel and to allocate these specific days of the training, we will be able to organize webinars & training on a much shorter notice and we can, when desirable, automatically record for replay at a time convenient for you. We initially aim for at least 2 webinars per months and as we get fluent with the platform ourselves, introduce also more in-depth & highly interactive paid training sessions given by product experts. Even when (hopefully) normal life returns after the covid19 pandemic, this makes very much sense to keep offering on a continuous basis.

What can you do?

Very simple: let us know what content is of interest to you! We want to tune the content in the free webinars and paid training as much as possible to your needs. We are eager to learn about what topics you want more coverage, what subject you wish to see covered in-depth and learn from it. This will be our main guideline for creating the content in the coming months & years.

Visit our calendar of events and register! We look forward to see you there and talk to you in our TMS Web Academy!


GraphQL, workflow engine, multitenancy and more: what you will do with Delphi in 2021

$
0
0

Here at TMS, we are working on so much new exciting frameworks and features that I decided to share with you what we expect to bring to you in 2021!

Photo by Rhett Wesley on Unsplash


Photo by Rhett Wesley on Unsplash

First, a disclaimer: this is not an official commitment. Some of the things listed here might be delayed or not be released at all. But of course, that's not our intention, since we are listing it here. We want to (and probably will) release all of this in 2021. But, since unexpected things might happen, we can never guarantee what will happen in future. One second thing: thislist only covers what is coming around TMS Business line of products. There is much more to come from TMS in 2021!

I was going to title this post as "TMS Business Roadmap for 2021". But I thought that the current title brings more attention and curiosity. And it looks like it worked, thanks for coming! ??

Ok, jokes aside, another reason is that we still don't know if all of the libraries, features and technologies listed here will be part of the TMS Business bundle, and the original title could be misleading.

But regardless, everything listed here will for sure be smoothly integrated with TMS Business - either using ORM (TMS Aurelius) or REST/JSON framework (TMS XData), or any other core product, what is for sure is that everything listed here makes up a huge ecosystem around TMS Business technologies.

An exciting year is coming ahead! So, without further ado, this is what we expect to bring to Delphi world this year, with TMS Business.


GraphQL

TMS is bringing GraphQL to Delphi! We have it already in a beta state, the core is complete, all is going fine. We still need to document everything, and add a few more features here and there, but it's in a very advanced stage.

This teaser video shows GraphQL server in action, written in Delphi! The frontend is GraphQL Playground JS framework, but still being served via a Delphi server.

Delphi GraphQL Hello World


The relevant parts of the code used to build the server in the video are the following. First, the GraphQL schema is built:

SchemaDocument := TGraphQLDocumentParser.ParseSchema(
    'type Query { hello(name: String!): String }');
  Schema := TGraphQLSchemaBuilder.Build(SchemaDocument);

  Schema.SetResolver('Query', 'hello', function(Args: TFieldResolverArgs): TValue
    begin
      Result := 'Hello, ' + Args.GetArgument('name').AsString;
    end
  );


Then, the endpoints for the GraphQL API and the GraphQL Playground are created:

  ADispatcher.AddModule(
    TGraphQLServerModule.Create('http://+:2001/tms/graphql', FSchema));

  ADispatcher.AddModule(
    TGraphQLPlaygroundModule.Create('http://+:2001/tms/playground', '/tms/graphql'));


And that's it for the "Hello, world" demo!


TMS Auth

A complete framework for adding authentication to your application, with user, roles and permissions management and providing features like login, registration, e-mail confirmation and more.

Relying on Aurelius ORM and XData REST framework, with a few lines of code you will get all your database setup and have an authentication API server running, with lots of features.

Well, it's said one picture is worth a thousand words, so here is an example of the available API out of box:

Auth Swagger Auth Swagger 2


And these are screenshots of an existing app built with TMS Web Core which is already using TMS Auth for user registration and login:

Auth User Registration


It will never been as easy to add user and permissions management and login system to your Delphi application and server!


BPM Workflow

A full workflow engine is coming. You might ask what is the difference between this new library and TMS Workflow Studio.

It's a night and day difference. TMS Workflow Studio is nice product, but it was made 13 years ago with a different goal in mind - desktop VCL applications - and when lots of technologies didn't even exist, and even several TMS products. Cross-platform, REST servers, ORM, cloud applications.

This new project is a workflow engine written from scratch, with all modern technologies and paradigms in mind. It will have a REST API, it will be cross-database, thread-safe, scalable, and of course will have lots of new features.

The following workflow, for example:

Renewal Process Workflow


Can be built from code this way:

RenewalProcess := TProcessBuilder.CreateProcess
    .Variable('process_id')
    .StartEvent
    .Condition(GroupedCondition([
      TRenewalAllowedCondition.Create,
      SubscriptionNotInAnyProcess
    ]))
    .Activity(SetProcessStatus(TProcessStatus.processing))
    .Activity(IssueInvoice)
    .ExclusiveGateway.Id('gateway1')
      .Condition(THasErrorCondition.Create)
      .Activity(TRenewalFailureActivity.Create).Id('renewal_failure')
      .Activity(SetProcessStatus(TProcessStatus.failed))
      .EndEvent
    .GotoElement('gateway1')
      .Condition(InvoiceIsPaid)
      .Activity(RenewSubscription).Id('renew_subscription')
      .ExclusiveGateway.Id('gateway4')
        .Condition(THasErrorCondition.Create)
        .LinkTo('renewal_failure')
      .GotoElement('gateway4')
        .Activity(TRenewalSuccessActivity).Id('renewal_success')
        .Activity(SetProcessStatus(TProcessStatus.succeeded))
        .EndEvent
    .GotoElement('gateway1')
      .Condition(InvoiceIsOpen)
      .Activity(ChargePayment).Id('charge_payment')
      .Activity(GetPaymentStatus).Id('get_payment_status')
      .ExclusiveGateway.Id('gateway2')
        .Condition(THasErrorCondition.Create)
        .LinkTo('renewal_failure')
      .GotoElement('gateway2')
        .Condition(GroupedCondition(
          TConditionOperator._or, [PaymentIsCanceled, PaymentIsFailed]))
        .LinkTo('renewal_failure')
      .GotoElement('gateway2')
        .Condition(PaymentIsSucceeded)
        .ExclusiveGateway.Id('gateway3')
          .Condition(InvoiceIsPaid)
          .LinkTo('renew_subscription')
        .GotoElement('gateway3')
          .Condition(InvoiceIsOpen)
          .LinkTo('charge_payment')
    .Done;
end;


And can be executed in a thread queue, can be instantiated using a REST API, and many more to come. Actually, you can follow what is being developed so far in its GitHub repository. We are still working on it of course, in both features and licensing terms.


REST Server Authorization

TMS XData, our amazing library for building REST APIs and multitier applications, will have an authorization mechanism that will be very easy to use.

Developers will be able to just add authorization attributes to methods (service operations) or entities (automatic CRUD endpoints) and everything will be applied accordingly. Fine-tuning the protection of your REST API will never be as simple.

  [Authorize]
  IDocumentService = interface(IInvokable)
    procedure Insert(Value: TDoc);

    [AuthorizeScopes('user, editor')]
    procedure Modify(Value: TDoc);

    [AuthorizeScopes('admin')]
    procedure Delete(DocId: string);

    [AuthorizeClaims('email')]
    procedure Approve(DocId: string);
  end;


In the example above, all methods (endpoints) require authentication, because the interface has an Authorize attribute that propagates to all methods. So, to invoke Insert, user must be authenticated. Still, to invoke Modify, the user must be authenticated and have either user or editor scope in its credentials. He must be admin to invoke Delete, and finally to approve a document, user must have an email in its claims.

It's also worth noting that the same strategy applies to entities that generate automatic CRUD endpoints:

  [Entity, Automapping]
  [EntityAuthorize]
  [EntityAuthorizeScopes('editor', [TEntitySetPermission.Modify, TEntitySetPermission.Insert])]
  [EntityAuthorizeScopes('admin', [TEntitySetPermission.Delete])]
  TCustomer = class
  {...}
  public
    property Id: Integer read FId write FId;
    property Name: string read FName write FName;
  end;


To access customer endpoints, user must be authenticated. But he must have editor privileges to modify and insert (PUT and POST) and must be admin to invoke DELETE. Easy and straightforward.


Development for the web: even easier

TMS XData is smoothly integrated with TMS Web Core, the TMS framework to build web applications. It provides easy-to-use, high-level client classes to access XData servers from Web Core applications. With the amazing release of TMS Web Core 1.6, several language features were introduced, like generics, async/await, attributes, among others.

This will make TMS XData client objects easier than ever to be used in web applications. The experience will be pretty similar to VCL/FMX applications, like retrieving entity objects from the server without having to deal with JSON directly and invoking endpoints using interfaces without having to worry about HTTP methods or URL endpoints.

And even more, async/await can be used. As an example, invoking a XData REST API endpoint asynchronously will be as easy as doing this:

PendingOrders := await(XClient.List<TOrder>('$filter=Status eq pending'));
if PendingOrders.Count = 0 then
  Exit; // no pending orders to process


The single line above will build the HTTP request with proper URL endpoint and HTTP method, invoke it, deserialize the returned JSON into a list of TOrder objects, and all asynchronously! The await function will guarantee that the next line will be executed only after the async execution is executed. Can't get easier than that.


Global filters and multitenancy

Our state-of-art ORM for Delphi, TMS Aurelius, will have amazing additions this year. One of them is the global filter mechanism. Users will be able to define filters globally, including parameters, and choose which entities will have it applied.

While global filters can obviously be used for any purpose, using it to build multitenant applications is the first one that comes to mind. Consider the following entity class mapped with filtering attributes:

  [Entity, Automapping]
  [Filter('Multitenant')]
  [FilterDef('Multitenant', '{TenantId} = :tenantId')]
  [FilterDefParam('Multitenant', 'tenantId', TypeInfo(string))]
  TProduct = class
  private
    FId: Integer;
    FName: string;
    FTenantId: string;
  public
    property Id: Integer read FId write FId;
    property Name: string read FName write FName;
    property TenantId: string read FTenantId write FTenantId;
  end;


You can use the class normally, without any filter. But you can also enable the "Multitenant" filter like this:

  Manager.EnableFilter('Multitenant')
    .SetParam('tenantId', 'acme');
  Products := Manager.Find<TProduct>.OrderBy('Name').List;


After you've enabled the "Multitenant" filter passing the proper id, you can use the Aurelius object manager as usual. But any request you do, like in the example, asking a list of products, will add the tenant filter.

Aurelius will not only allow global filters for queries, but also will allow you to enforce the filter in INSERT, UPDATE and DELETE operations:

  FEnforcer := TFilterEnforcer.Create('Multitenant', 'TenantId', 'FTenantId');
  FEnforcer.AutoComplyOnInsert := True;
  FEnforcer.AutoComplyOnUpdate := True;
  FEnforcer.Activate(TMappingExplorer.Get('Samples'));


Thus, you can simply create or modify a product as you would usually do in single tenant application, but the filter enforcer will make sure to set data to the proper tenant id (or raise an error if the tenant is wrong, depending on your configuration).

Building single-database multitenant applications with TMS Aurelius is already possible, of course. But it will be really easy with the upcoming features. And not only that: building multi-database multitenant applications will also be easy with the new TMultiTenantConnectionPool:

  FMultiPool := TMultiTenantConnectionPool.Create(
    TXDataHttpHeaderTenantResolver.Create('tenant-id'),
    TDBConnectionPoolFactory.Create
    );


The pool will automatically choose the correct database based on the HTTP header tenant-id - or any other criteria you might choose. All transparently.

In summary: you will be able to build your app as if you are coding for single tenant applications, and let Aurelius do everything under the hood to make it multitenant, with minimum effort and in a robust and reliable way.


Data validation

Another great feature coming is data validation. Again, you can already do it using events, but soon it will be orders of magnitude easier. You will be able to add validators to your entities in several ways, attributes being the most common (irrelevant parts of the following class declaration removed for clarity):

  TCustomer = class
  private
    [Required]
    FName: string;
    
    [EmailAddress]
    FEmail: string;
  
    [DisplayName('class rate')]
    [Range(1, 10, 'Values must be %1:d up to %2:d for field %0:s')]
    FInternal_Rate: Integer;


All fields will be proper validated according to the validation attributes applied. Name will be required, Email must be a valid address and FInternal_Rate value must be between 1 and 10. With a few lines you will guarantee that the entity will be persisted with a valid state.

Validation will also help you with your API and GUI. Note how you can provide readable display names and error messages. When using validation in your API build with XData, the API responses will be detailed and informative, and all automatically:

Validation JSON response


And, of course, you can benefit from such information to easily build nice user interfaces informing the user about the validation results. The following screenshot is the same one used for the TMS Auth example above, but displaying results for password validation:

Password validation results


Attribute-based event handlers

Events are an important feature of any framework, and with Aurelius is not different. It provides several events you can use to add custom business logic. You can add specific code just before an entity is being saved, after an entity is deleted, when an SQL is being executed, among others.

The interesting feature coming is that you will now be able to add event handlers directly in your classes, using attributes. This will make your code even more organized, will improve readability and allow you to better follow the single-responsibility principle. It will be as simple as this:

TCustomer = class
  [OnInserting]
  procedure DoSomethingBeforeSave;

  [OnDelete]
  procedure DoSomethingAfterDelete;


Whenever a customer entity is about to be persisted, OnInserting method will be called and you can add any relevant code in that method. You can receive arguments in OnInserting, or you can even use with without them, like in the example above, making you class really independent of 3rd party custom types.

And more events are coming as well, for example, the new data validation mechanism mentioned above will also offer you an OnValidate event, which you can easily use like this:

TCustomer = 
  [OnValidate]
  function CheckBirthday: IValidationResult;

{...}  

  function TCustomer.CheckBirthday: IValidationResult;
  begin
    Result := TValidationResult.Create;

    if YearOf(Birthday) < 1899 then
      Result.Errors.Add(TValidationError
        .Create('A person born in the XIX century is not accepted'));

    if (MonthOf(Birthday) = 8) and (DayOf(Birthday) = 13) then
      Result.Errors.Add(TValidationError
        .Create('A person born on August, 13th is not accepted'));
  end;


That's all...?

I hope you have followed me until here, and I hope you are as excited as us with the upcoming features and and libraries. Yes, that's a lot of things to expect for Delphi and TMS Business in 2021! But I'd like to stress that what's coming is not necessarily limited to what we put here. There might be even more! (Things we cannot disclose right now).

Did you like the news? Please comment below, let us know what you think and what are your opinions and expectations on this. And don't forget to subscribe to our news channels to be informed when things are released and for many other exciting news from TMS: subscribe to our e-mail newsletter, follow our Facebook page and subscribe to our YouTube channel!

Update: Want to see these listed features in action? Register for the free webinar "What is coming in TMS BIZ in 2021", to happen on Tuesday, February 23, 2021 3:00:00 PM UTC at the TMS Web Academy!


Free webinar: What is coming in TMS BIZ in 2021

VCL Grid goodies

$
0
0

TMS Software Delphi  Components

A little known and little used but at the same time very powerful feature is the use of HTML controls in TAdvStringGrid cells. HTML controls are the concept of specifying controls for cells via HTML tags in the HTML assigned to a grid cell. It is the grid HTML  engine that is then responsible for rendering the controls and for handling the interacting with these controls.

Among the supported controls are : checkbox, radiobutton, button, edit, combobox.

While the grid alternatively has functions to add a checkbox, button, radiobutton to a cell via grid.AddCheckBox(), grid.AddButton(), grid.AddRadioButton(), using HTML controls means you can add as many of these controls you want, in the order you want and mixed with text and images. 

Performance and resources

You might wonder why introducing this concept when you could add a TPanel instance to a cell with grid.CellControls[Col,Row] and add any control you want to the panel to have these in a grid cell. While this is a perfectly possible approach, this quickly turns into a very bad idea when you would want to fill hundreds or thousands of cells in the grid. Note that for a grid of only 100x100 columns/rows, there are already 10.000 cells. When you would add for each cell a TPanel with on the TPanel a TCheckBox, TEdit and TButton, this means you would ask Windows to allocate 4 window handles for each of these controls per cell. For a 100x100 grid, this is creating 40.000 window handles. This is absolutely not a good idea to waste precious Windows resources & performance for!

Resource friendly HTML controls

When adding HTML controls to a cell, this HTML control only exists in the cell string value and is rendered when the cell needs to be rendered only. It is rendering using drawing, no real Windows controls are involved. In a 100x100 columns/rows grid, it is only the visible cells that well be rendered, so typically far less than 10.000 cells. Also when the user interacts with a checkbox, radiobutton or regular HTML control button, there is never a real Windows control involved. All is rendered by the grid. It is only when the user starts editing in a HTML edit or combobox control that just during editing time, a real Windows control is involved. That means, the grid  will internally create a TEdit or TComboBox control, position it in the cell, allow the editing and will remove the control again after editing.

You can see that with this architecture, whether you add 10.000, 50.000 or even more HTML controls does not really matter for performance or resource usage. Maximum one control at a time will be live and used.

Using HTML controls

Using HTML controls is simple. These are represented in the cell HTML as tags of the type <CONTROL> and this tag had the attributes:

  • TYPE: sets the type of the control. This can be EDIT, CHECK, RADIO, BUTTON, COMBO
  • WIDTH: sets the width in pixels for the control
  • VALUE: sets the value of the control 
  • ID: a unique control identifier that can be used to programmatically get & set its value

To get or set a control value, the grid has the property

grid.ControlValues[Col,Row: integer; ID: string): string;

When the user interacts with any of the HTML controls in the cell, the grid can notify with the following events:

grid.OnControlClick       : event triggered when a control is clicked, returns the ID of the control

grid.OnControlComboList   : event triggered to query values for a HTML control combobox when it is about to be edited

grid.OnControlComboSelect : event triggered when the user has selected a value in a HTML combobox control

grid.OnControlEditDone    : event triggered when the editing in a HTML edit control stopped by user leaving focus


Putting it together

Here is a code snippet that initializes a default grid with 2 cells that feature HTML controls:

procedure TForm1.FormCreate(Sender: TObject);
var
  UserName: array[0..128] of char;
  szUserName: cardinal;
begin
  szUserName := 128;
  GetUserName(UserName, szUserName);

  AdvStringGrid1.ColWidths[1] := 192;
  AdvStringGrid1.RowHeights[1] := 72;
  AdvStringGrid1.RowHeights[2] := 72;

  // if we want the HTML controls in the cell to be enabled for editing, editing needs to be enabled at grid level
  AdvStringGrid1.Options := AdvStringGrid1.Options + [goEditing];

  // adds a checkbox and button HTML control to cell 1,1
  AdvStringGrid1.Cells[1,1] := '<CONTROL TYPE="CHECK" WIDTH="24" ID="CHK"> <IMG SRC="IDX:0"> Microphone <BR><BR><CONTROL TYPE="BUTTON" WIDTH="80" ID="BTN1" VALUE="Connect">';

  // adds an edit control and button HTML control to cell 1,2
  AdvStringGrid1.Cells[1,2] := 'Username: <CONTROL TYPE="EDIT" WIDTH="128" ID="USER"> <BR><CONTROL TYPE="BUTTON" WIDTH="80" ID="BTN2" VALUE="Login">';

  // initializes the value of the HTML edit control in cell 1,2 to the Windows username
  AdvStringGrid1.ControlValues[1,2,'USER'] := UserName;
end;

Now, we can react to events triggered from the HTML cell controls by implementing the grid.OnControlClick event and check for the unique ID of the HTML control that triggered the event:

procedure TForm1.AdvStringGrid1ControlClick(Sender: TObject; ARow,
  ACol: Integer; CtrlID, CtrlType, CtrlVal: string);
var
  v: string;
begin
  // check of button in cell 1,1 was clicked
  if CtrlID = 'BTN1' then
  begin
    // get value of the HTML check control in cell 1,1. 
    // HTML check value returns TRUE when checked or empty when not checked
    v := AdvStringGrid1.ControlValues[1,1,'CHK'];
    if v = 'TRUE' then
      ShowMessage('Connect with microphone')
    else
      ShowMessage('Connect without microphone');
  end;

  // check of button in cell 1,2 was clicked
  if CtrlID = 'BTN2' then
  begin
    // get value of the HTML edit control in cell 1,2 
    v := AdvStringGrid1.ControlValues[1,2,'USER'];
    ShowMessage('Login for '+ v);
  end;
end;

The result when running a VCL application with TAdvStringGrid and the cell controls is:

TMS Software Delphi  Components

Summary

TAdvStringGrid is all about flexibility and packed with features. HTML controls in cells can be that specific feature you are looking for to give your users a performance & resource friendly but better experience dealing with interaction in cells.
Note that besides HTML controls, the mini-HTML rendering engine in TAdvStringGrid can do much more other things to nicely format and visually fine-tune appearance of data in cells. For details about the capabilities of this small but fast mini-HTML rendering engine, check this resource. Note that these mini-HTML capabilities are also available in many more mini-HTML enabled VCL controls in the TMS VCL UI Pack.

More #GRIDGOODIES ?

Today's #GRIDGOODIES article was requested by a user of the TMS VCL UI Pack's TAdvStringGrid. If you also have suggestions or ideas to cover a maybe lesser known feature in the grid, let us know in the comments or by email!


Real-world Delphi projects out of this world...

$
0
0

How much of our daily life here on planet Earth is impacted by running Delphi code is beyond imagination. Whether it is controlling trains on the French railway system, contact tracing in the COVID19 pandemic in Poland, salary calculation and reporting in Germany, tax invoice approvals in Brazil,... the list is endless. But Delphi's impact already reached out beyond planet Earth with several projects of the NASA and this week we stumbled on the social media post from Dave Akerman mentioning it was Delphi based software where several TMS components were involved, that was used to produce the sophisticated coating for the Perseverance parachute that was instrumental in its highly critical but eventually successful and safe landing on Mars on Feb 18:

TMS Software Delphi  Components
As we chatted, I found out that David had a similar educational background as me in electronic engineering, also loves car racing, worked together with a very good friend of mine having a company Theys Industrial producing electronic PCB's 2km away from here and I learned that the fabrics for the Perseverance parachute were produced by the company Picanol that is like 20km driving from where the TMS headquarters are. Talking about coincidences...
Well, that was enough a reason to get in touch with David and have a chat about our passion we all share: software development with Delphi! Our colleague Holger Flick produced this video interview with David, where David tells exciting stories of how he got into software development, how he used Delphi for controlling machines precisely mixing chemicals, how he also uses Delphi for his hobby of tracking weather measurement balloons (where TMS WEB Core plays a role in), how he uses the FireMonkey framework for writing software for a Sony watch and so much more...

I'm sure you will enjoy this video interview between two passionate Delphi software developers and be inspired to also do cool things with Delphi!


Viewing all 1006 articles
Browse latest View live


<script src="https://jsc.adskeeper.com/r/s/rssing.com.1596347.js" async> </script>